If you suspect a gas line leak, safely evacuate and shut off the gas supply immediately. Confirm the leak using detection methods like soap bubble testing or electronic gas detectors.
Next, isolate the affected section and perform pressure testing to identify leak points. Use professional-grade repair clamps or squeeze-off tools to stop flow and seal leaks. Verify repair integrity by re-testing pressure and inspecting for bubbles or odors.
Understanding these precise steps guarantees safe and effective gas line leak repair.
Key Takeaways
- Immediately evacuate the area, shut off gas supply if safe, and notify emergency services before attempting any repair.
- Identify leaks by applying a non-corrosive soap bubble solution to joints and observing bubble formation.
- Use calibrated pressure gauges and maintain test pressure for at least 10 minutes to confirm leaks before repairs.
- Repair minor leaks by tightening fittings or replacing damaged sections with approved materials and proper sealing techniques.
- Always call a licensed professional for significant leaks or if unsure, and never handle gas valves without expertise.
Recognizing Signs of a Gas Line Leak
You should always stay alert for specific signs that indicate a gas line leak, as early detection is critical for safety.
Listen for hissing or whistling near gas meters or appliances, and watch for pilot flames burning orange or yellow instead of blue, signaling ventilation issues.
Look for white clouds or dust around gas lines and detect the distinct rotten egg smell from Mercaptan odorant added to natural gas. Installing gas detectors can provide an additional layer of safety by sensing leaks early.
Observe abnormal bubbling in water or soil disturbances without wind near buried pipes. Check for dead or browning vegetation following pipeline paths, as oxygen displacement damages plants.
Monitor physical symptoms like dizziness, headaches, or breathing difficulties in occupants, including shortness of breath. Note any unusual pet behavior or skin irritation. Finally, inspect gas infrastructure for visible damage or unexpected bill increases indicating leaks.
Immediate Safety Measures to Take
When a gas line leak is suspected or detected, immediate safety measures must be enacted to prevent ignition and guarantee occupant safety.
You should evacuate the area promptly, moving by foot and upwind if outdoors. Direct others to leave without reentering, and assemble at a safe distance. Clear room, building, or area of all occupants; do not reenter until declared safe.
Eliminate all ignition sources by avoiding open flames, electrical switches, and devices. Cut power remotely if possible. Be aware that emergency situations like gas leaks often require contacting professionals who may charge emergency surcharges for after-hours service.
Shut off gas appliances immediately; only close the gas meter valve if a strong odor or hissing is present. Avoid handling pipeline valves yourself. After evacuation and ignition elimination, ventilate by opening windows and doors cautiously to avoid sparks.
Finally, from a safe location, notify emergency services and the gas supplier. Provide precise incident details to assure proper response and containment.
Methods for Detecting Gas Leaks
Detecting gas leaks requires employing specialized tools and techniques that identify the presence of escaping gases quickly and accurately.
You can use electronic gas detectors with infrared, electrochemical, or semiconductor sensors to measure gas presence by detecting changes in absorption, electrical currents, or conductivity.
These devices need calibration every 6-12 months for reliable results. Regular calibration is critical to ensure detection accuracy and prevent false readings.
Ultrasonic detectors capture inaudible sound waves from pressurized leaks, useful in noisy industrial settings when properly aligned. Thermal imaging cameras visualize temperature variations caused by gas leaks, revealing hot spots even behind walls.
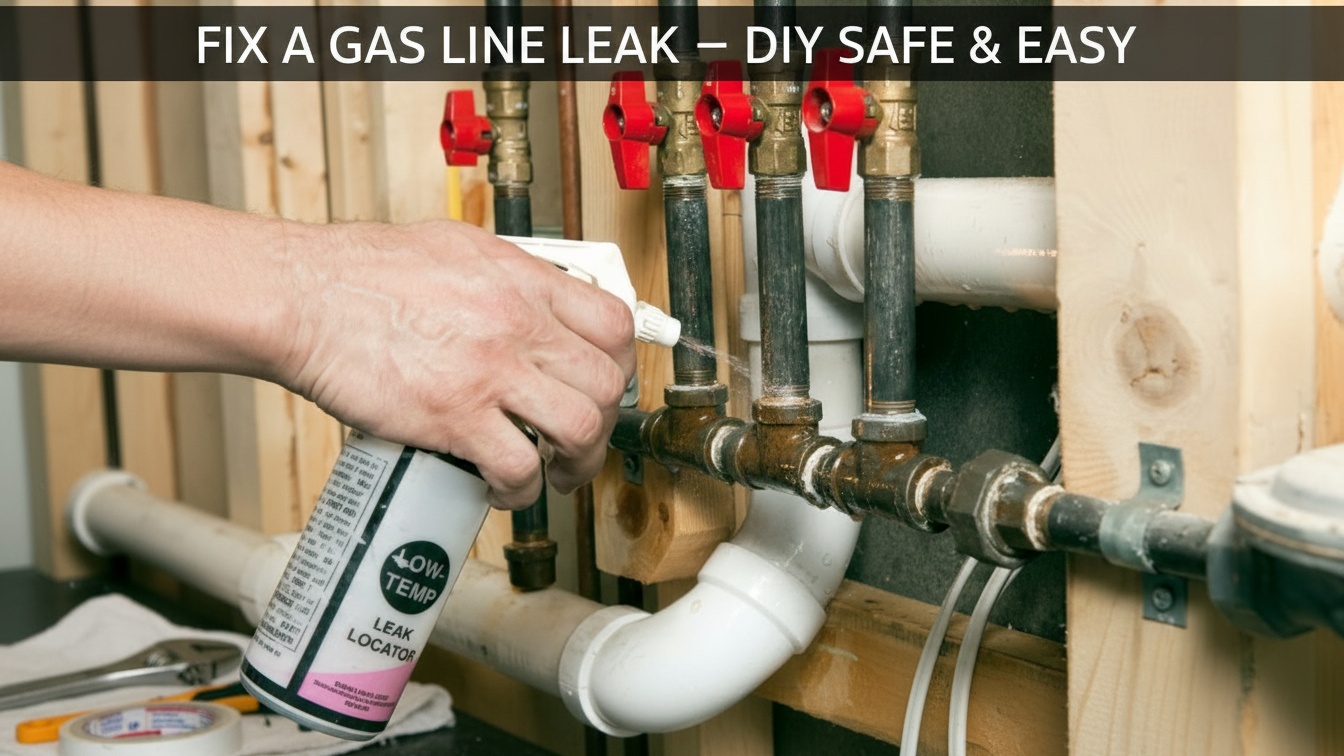
For localized detection, apply soap bubble tests on joints, where bubbles indicate leaks, or use tracer gas sniffers with handheld probes to find small leaks using helium or hydrogen.
Pressure Testing Procedures for Leak Identification
Alright, let’s dive into the pressure testing procedures for leak identification. First things first, you’ll want to make sure the system is properly sealed and isolated. This step is crucial because it helps ensure that you get accurate pressure readings.
Pressure testing is typically performed by certified professionals who are familiar with the procedures and safety considerations. Specialized equipment with adjustable sensitivity can improve the precision of leak detection.
Once that’s all set, the next step is to apply pressure gradually. Make sure to use calibrated gauges and place them at strategic points throughout the system. This helps avoid any sudden stress that could throw off your results.
Finally, keep an eye on the pressure decay over the specified hold time. This monitoring is key to identifying any leaks accurately. So, take your time, and be thorough with each step!
Sealing and Isolation
To pinpoint leaks during pressure testing, start by sealing off sections of the gas line and isolating the system effectively.
Close appliance shut-off valves to prevent gas flow beyond the test area. Then isolate the segment by capping or plugging open ends. Use appropriate sealing fittings rated for the test pressure, ensuring airtight containment.
Install calibrated pressure gauges at both the source and the system’s farthest point to monitor pressure consistency accurately. The test pressure must be no less than 1.5 times the proposed maximum working pressure to ensure safety and accuracy.
Remove air pockets by bleeding vents and gradually apply pressure using dry inert gases like nitrogen or air. Maintain test pressure, typically 1.5 times the maximum operating pressure, for at least 10 minutes, observing for pressure drops.
Apply bubble soap solution to joints and fittings; formation of bubbles indicates leaks that require immediate repair before proceeding.
Pressure Application Techniques
After sealing and isolating the gas line, apply pressure carefully to verify system integrity.
Use a test pressure at least 1.5 times the maximum working pressure or at least 3 psi, whichever is greater.
This is typically around 6 psig for low-pressure natural gas.
Select an approved medium such as dry nitrogen or air. The pressure medium specified for testing is air, which is commonly used due to safety and availability. Using nitrogen is also favored due to its inert properties and effectiveness in fire suppression.
Never use propane or oxygen. Make certain all appliances are disconnected and bleed system air pockets before pressurizing.
Employ calibrated manometers at both the pressure source and the system’s farthest point. Verify gauge accuracy beforehand. Gradually increase pressure while monitoring for stability.
Maintain temperature equalization to avoid false readings. Temperature equalization must be maintained throughout the test to ensure accuracy. Hold the pressure for a minimum of 10 minutes without any detectable drop.
These precise steps confirm leak presence and overall system integrity before proceeding with further repairs.
Monitoring Pressure Decay
When monitoring pressure decay during leak testing, you must use calibrated gauges placed at both the pressure source and the system’s farthest point to detect any pressure loss accurately. Proper calibration and maintenance of these gauges are essential to prevent premature failure of the testing equipment.
Make certain gauges have a range no more than five times the test pressure and calibrate them properly before use.
Apply test pressure at a minimum of 1.5 times the maximum working pressure or at least 3 psi for new piping.
Maintain the pressure steadily for at least 10 minutes, equalizing system and air temperature to avoid false readings. Using a bubble soap leak detector can help visually identify leak points during this process.
Any perceptible pressure drop indicates a leak requiring repair. Account for environmental factors like temperature fluctuations and bleed air pockets before testing.
After the test, verify zero pressure loss before reconnecting appliances to confirm system integrity and safety.
Applying Soap Bubble Testing on Suspected Areas
To perform soap bubble testing effectively, you’ll want to start by preparing a good soap solution. It’s simple—just mix some dish soap with water. Just a quick tip: steer clear of ammonia-based soaps because they can damage your fittings.
Measuring cups/spoons can help ensure you get the right proportions for the best results. Always remember to call 811 before starting any work to have underground utilities marked and ensure safety.
Once your solution is ready, go ahead and apply it generously using a spray bottle or a sponge. Make sure to cover all the suspected joints, valves, and connections while the system is under pressure.
Now, this is the exciting part! Keep a close eye out for any bubble formation. Remember, even tiny bubbles can indicate gas leaks, and those need your immediate attention. So, stay vigilant!
Soap Solution Preparation
Several key components and careful preparation steps guarantee an effective soap solution for detecting gas line leaks through bubble testing.
Use dish soap, preferably petroleum-free, to form bubbles, diluted with water at about a 2:1 ratio (water to soap). Avoid ammonia-based soaps to prevent reactions. The choice of container and application method can affect the visibility of bubbles during testing.
Optional glycerin improves bubble stability. Mix thoroughly in a tightly sealed spray bottle or container with a sponge applicator.
Always prepare fresh batches for consistent results and perform mixing in ventilated, flame-free areas. This method provides immediate results through visible bubbling.
| Component | Recommendation |
|---|---|
| Soap | Dawn or similar dish soap |
| Diluent | Water, 2 parts water to 1 part soap |
| Container | Spray bottle or sponge applicator |
Application Techniques
Start by applying the soap bubble solution evenly across all suspected leak areas, including pipe joints, soldered connections, valve stems, and threaded fittings. Be sure to clean the exterior surfaces beforehand to ensure better adhesion of the solution using routine care.
Use a spray bottle for broad, uniform coverage or a dauber for precise application on tight joints. A sponge or brush can also manually spread the solution, especially on installed equipment surfaces. The pressure differential created by the gas system is crucial for driving gas through any leaks, ensuring bubbles form at these points.
Avoid standard dish soap; choose a specialized, non-corrosive bubble detector to make certain bubble formation and prevent corrosion. Apply the solution over the entire hose assembly, from the cylinder valve to the endpoint, covering all connections thoroughly.
After application, pressurize the system by activating gas flow to maintain steady pressure. This guarantees the soap solution reacts properly at leak points during testing. Repeat application and pressurization as needed for all-inclusive inspection.
Identifying Leak Bubbles
Keep an eye out for bubble formation when applying the soap solution, as these bubbles reveal where pressurized gas is escaping from joints or fittings. Using visual inspection techniques similar to those in optical devices can enhance leak detection accuracy.
Small bubbles appearing within a minute indicate minor leaks, while steady clusters signal perforations. You should inspect joints, fittings, valves, and hose assemblies thoroughly, focusing on corroded or worn areas.
Immediate bubble formation suggests significant leaks, especially on flare fittings with improper seals. Return after a few minutes to detect slow leaks.
Use high-viscosity, non-ammonia soap solutions for clearer, persistent bubbles without damaging brass components.
To prepare the soap solution, mix water and dishwashing liquid, as dishwashing liquid produces more bubbles than alternatives.
Confirm leaks by observing bubbles on all fitting sides, combined with any gas odor. Continuous monitoring helps detect pinprick leaks, ensuring precise identification before proceeding with repairs.
Tools and Equipment Used by Professionals
When addressing gas line leaks, professionals rely on specialized tools designed for efficiency and safety.
You’ll find hand-operated squeeze-off tools like the TC1-S series essential for quickly stopping gas flow in polyethylene pipes, featuring single-person operation and Lockout/Tagout capabilities.
For permanent repairs, systems such as the TridentSeal® enable live gas sealing up to 125 psi without service interruption.
Emergency containment requires foam plugs and polymer-based putties to control leaks swiftly.
Repair clamps like the JCM 121 UCC and 151 UCC models provide material-specific solutions for cast iron and steel lines, ensuring durability in varying soil conditions.
Mechanical tools, including chain and strap wrenches, allow you to manipulate pipes without damage, maintaining integrity during repairs.
Additionally, innovative squeeze-off tools with top-down application provide rapid flow stoppage, enhancing safety and speed during repair operations.
Each tool is engineered to uphold safety and regulatory standards.
Steps to Verify Successful Gas Line Repairs
Although repairing a gas line addresses the immediate issue, verifying the repair’s success demands a systematic approach to guarantee safety and compliance.
First, conduct pressure testing by sealing test segments, filling the line with water or air, and monitoring calibrated gauges for stability at the required pressure. This method is recognized as one of the most reliable residential leak-detection methods due to its accuracy in identifying pressure drops and potential leaks.
Employing certified testing protocols ensures that the pressure test adheres to recognized safety standards. Next, apply a bubble solution to all joints and fittings, checking for bubble formation that indicates leaks.
Utilize electronic detectors, handheld gas sniffers, ultrasonic testers, and infrared cameras to confirm zero gas presence, ensuring the use of professional-grade detection equipment for precise and sensitive measurements.
Perform ambient air quality assessments and visual inspections for corrosion or hissing sounds. Incorporating routine inspections of reinforced structures can prevent unnoticed deterioration that may contribute to leaks.
Finally, document all test results, maintain repair records, and schedule follow-up monitoring to validate sustained integrity. This multi-step verification assures the repaired gas line is safe and compliant with industry standards.
Frequently Asked Questions
Can I Use Household Items to Temporarily Seal a Gas Leak?
You shouldn’t rely on household items to temporarily seal a gas leak because they won’t create a gas-tight seal and could worsen the situation.
Instead, immediately shut off the main gas valve, ventilate the area, evacuate, and call professionals.
Only certified experts with specialized materials and tools can safely repair gas leaks.
Attempting DIY fixes can increase explosion risk and delay proper repairs, endangering your safety and property.
How Long Does It Typically Take to Repair a Gas Line Leak?
You can expect a typical gas line leak repair to take between 1 to 3 days, depending on severity and location.
Simple leaks may be fixed within an hour, while complex issues requiring excavation can extend to 8-12 hours or more.
The process includes leak detection, gas shutoff, repair, pressure testing, and utility approval.
Delays often arise from part availability, permits, or difficult access, so plan accordingly for thorough restoration.
Are There Any Health Risks From Minor Exposure to Natural Gas?
Yes, even minor exposure to natural gas can pose serious health risks you shouldn’t ignore. You might initially experience headaches, nausea, or dizziness caused by oxygen displacement.
Low-level exposure irritates your eyes, nose, and throat, and can quickly lead to fatigue and weakness.
Over time, repeated exposure increases your risk of respiratory problems, neurological issues, and long-term conditions like depression or cardiovascular disease.
Always take any gas leak seriously for your safety.
What Qualifications Should a Professional Have to Repair Gas Leaks?
You should hire a professional with a Gas Fitter Class B certification for residential or commercial leaks under 400,000 BTUs.
For industrial settings, they need Class A certification after two years of Class B experience.
Verify they hold a valid gas fitter’s license or specialized gas training beyond plumbing.
Confirm compliance with local codes, permits, and inspections.
Proper certification guarantees safe, code-compliant repairs, preventing leaks, health risks, and legal liabilities.
How Often Should Gas Lines Be Inspected for Leaks?
You should have your gas lines reviewed at least once a year, or more frequently if your home’s a seasoned veteran with steel pipes or heavy gas use.
Local codes often require these checks, ideally before the heating season. If you catch any unusual scents or sounds, don’t wait, get an immediate inspection.
Certified pros use advanced tools to guarantee safety and efficiency, keeping risks like leaks or corrosion well in check.
Safety First, Always: The Final Word on Gas Leak Repairs
You might think fixing a gas line leak is as simple as a quick patch, but ignoring proper detection and testing only invites disaster. By following precise pressure tests, soap bubble inspections, and safety protocols, you make certain your repair truly holds.
Don’t let shortcuts become your biggest leak; trust the tools and techniques professionals rely on. After all, when it comes to gas, overlooking details isn’t just careless; it’s downright dangerous.