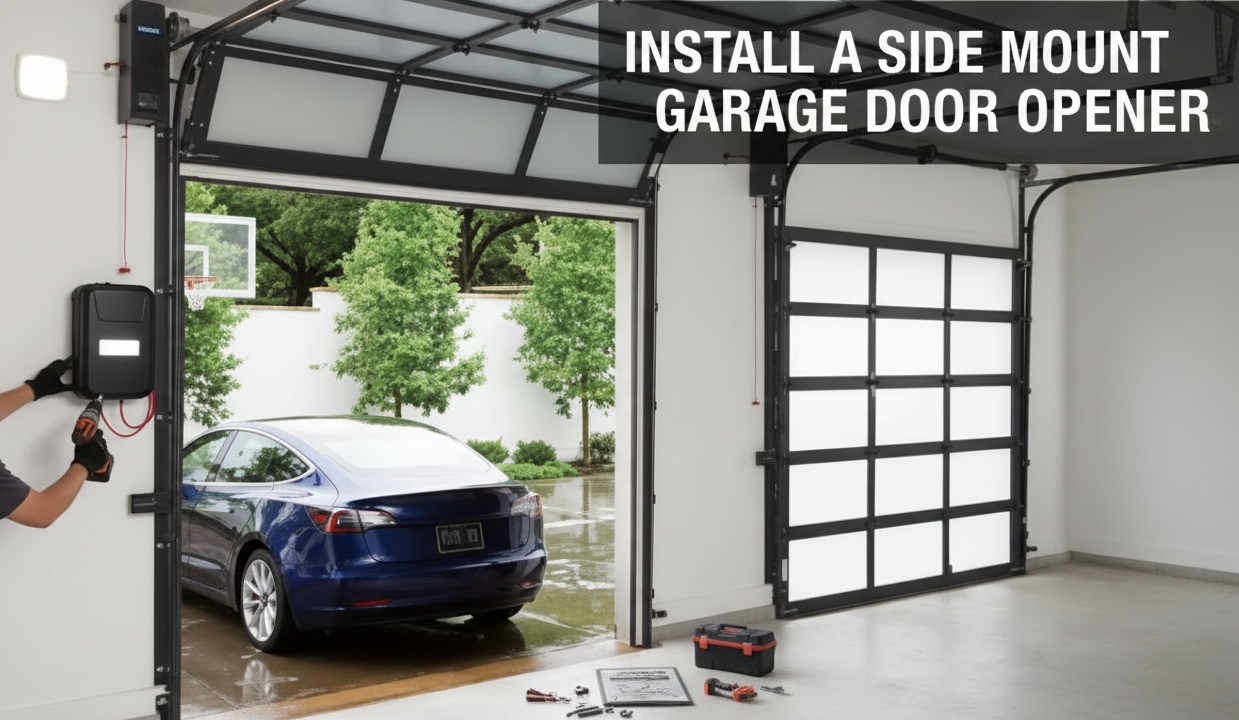
To install a side mount garage door opener, first choose a wall with secure studs and clear space for the mount bracket. Align and attach the bracket concentrically to the torsion shaft, securing it firmly with lag screws.
Connect the drive coupler and tighten set screws precisely. Wire the wall console and safety sensors properly, then install the emergency release rope and any safety monitors.
Program the opener’s open/close limits and test all functions thoroughly. Below, you’ll find detailed steps to complete your installation confidently.
Key Takeaways
- Choose the mounting side with ample wall space and studs, ensuring the surface is level and free from obstacles for secure bracket attachment.
- Position the side mount bracket concentrically with the torsion shaft and hand-tighten the drive coupler for initial alignment.
- Secure the mounting bracket with lag screws into studs, using pilot holes to avoid wood splitting, and tighten coupler set screws with a 10mm wrench.
- Mount safety sensors on door tracks facing each other, aligning beams until LED indicators confirm proper sensor alignment.
- Install and test the emergency release rope on the opener trolley, ensuring it hangs six feet above the floor and operates smoothly for manual door disengagement.
Prepare Your Garage Door and Tools for Installation
Begin by confirming that your garage door is properly balanced and operates smoothly without any obstructions.
Test manual lifting; it should move evenly with minimal resistance and stay open at halfway points.
Next, disconnect and remove any existing opener hardware, guaranteeing all mounting brackets and sensors are detached.
Gather necessary tools including a 10mm wrench, level, pliers, and appropriate screws.
Verify availability of a nearby electrical outlet for the opener power supply.
Consult your specific model’s owner’s manual for any unique requirements or additional tools.
Clear the installation area to prevent interference and guarantee safety.
Completing these preparatory steps will facilitate a streamlined and accurate installation process for your side mount garage door opener.
Additionally, ensure that all wiring and control components are inspected for electrical faults to prevent unintended door operation during or after installation.
Choose the Best Side for Mounting Your Garage Door Opener
When selecting the side to mount your garage door opener, consider the available clearance and the proximity of an electrical outlet to guarantee efficient installation and operation.
Inspect both sides of the garage door to identify obstructions such as pipes, electrical wiring, or shelving that may interfere with mounting.
Check both garage door sides for obstacles like pipes or wiring that could hinder mounting.
Choose the side with adequate wall space to securely attach the mounting bracket to studs.
Verify the torsion bar end is accessible, as the drive coupler must fit onto it.
Confirm an electrical outlet is nearby to power the opener without requiring extensive wiring adjustments.
Also, evaluate the approach path for the door’s movement to prevent interference.
Selecting the best side assures stability, simplifies wiring, and supports smooth opener function.
Additionally, ensure the mounting surface is level and plumb to prevent operational issues and ensure proper alignment during installation.
Attach the Side Mount Bracket and Drive Coupler
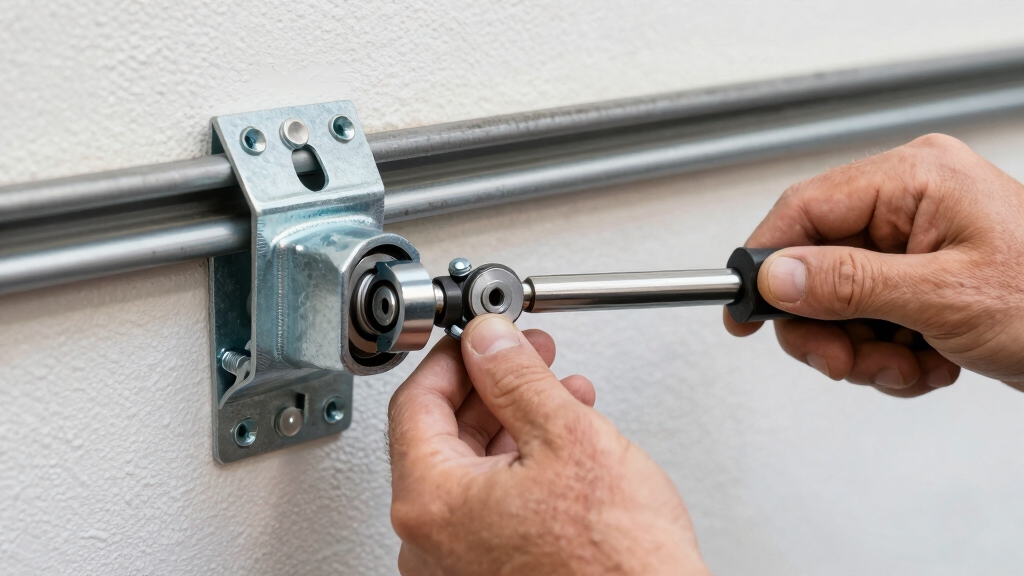
Alright, let’s get started! First things first, you’ll want to find the end of the torsion bar on the side where you plan to mount everything. It’s pretty straightforward! Just slide the drive coupler onto the torsion shaft and make sure to hand-tighten it securely.
Once that’s done, the next step is to attach the side mount bracket. You’ll need some lag screws for this part, and remember to anchor them into the studs to ensure everything holds firm. It’s all about that solid grip!
For enhanced security and durability, ensure the bracket is mounted to a reinforced frame to resist forced entry and maintain alignment under stress.
Locate Torsion Bar End
Before attaching the side mount bracket and drive coupler, locate the torsion bar end on the side of the garage door you’ve chosen for installation.
This is the solid steel shaft running horizontally above the door, which stores tension to counterbalance the door weight. Precise identification guarantees proper alignment and secure fastening of the opener.
Use the table below to verify key torsion bar end details:
| Feature | Description |
|---|---|
| Location | Above door, near top bracket |
| Shape | Cylindrical steel shaft |
| Function | Stores torsion spring tension |
| Inspection | Check for rust, wear, or damage |
Confirm the torsion bar end condition before proceeding to attach the side mount bracket. Proper maintenance and inspection are essential since worn parts can cause operational issues and safety hazards.
Install Drive Coupler
After confirming the torsion bar end is in good condition and properly located, slide the drive coupler onto the torsion shaft. Hand-tighten the coupler to allow slight adjustment before final securing.
Next, attach the side mount bracket to the wall or door jamb, aligning it precisely with the torsion shaft. Make certain the bracket is level to prevent mechanical binding.
Follow these steps to correctly install the drive coupler and side mount bracket:
- Position the bracket so the coupler aligns concentrically with the torsion shaft.
- Secure the bracket using lag screws into solid wood studs.
- Tighten the set screws on the drive coupler using a 10mm wrench to lock it firmly onto the torsion shaft.
This guarantees a rigid connection for reliable opener operation. It is also important to inspect wiring connections carefully during installation to avoid power and wiring issues that could affect opener sensor functionality.
Secure Mounting Bracket
Secure the side mount bracket firmly to the wall or door jamb by aligning it precisely with the drive coupler on the torsion shaft.
Use a level to make certain the bracket is perfectly vertical before marking screw locations.
Drill pilot holes into the studs to prevent wood splitting.
Attach the bracket with lag screws, tightening them securely for stable support.
Next, slide the drive coupler onto the torsion shaft, aligning it carefully with the bracket’s mounting plate.
Hand-tighten the coupler set screws initially, then fully secure them with a 10mm wrench after confirming exact alignment.
Double-check the bracket’s position and coupler connection to prevent any binding or misalignment during opener operation.
Proper securing guarantees smooth, reliable function of your side mount garage door opener.
For enhanced durability and security, use tamper-resistant fasteners when attaching the bracket to prevent loosening or unauthorized removal.
Wire the Wall Console and Safety Sensors for Your Garage Door Opener

When wiring the wall console and safety sensors, position the wall console approximately 5 feet high near your garage entry for easy access.
Run the console wires neatly along the ceiling, securing them with staples to prevent sagging. Connect the wires to the designated terminals on the opener unit, guaranteeing firm contacts.
Securely staple console wires along the ceiling and connect firmly to designated opener terminals for reliable operation.
For the safety sensors, attach them to the door tracks at the bottom, facing each other horizontally.
Align their beams precisely to guarantee proper operation. Connect sensor wires to the corresponding terminals on the opener.
Follow these steps:
- Staple wires from wall console to opener, avoiding sharp bends.
- Mount sensors on tracks, adjust until LED indicators show alignment.
- Connect sensor wires securely to opener terminals.
This wiring guarantees reliable control and safety function for your garage door opener. Always ensure to disconnect power before working on sensor wiring to maintain safety first measures.
Install Emergency Release and Additional Safety Features
First things first, let’s make sure you have the emergency release rope securely attached to the opener’s designated handle. This way, you can quickly operate it manually if there’s ever a power loss. It’s a simple step, but super important!
Next up, if your model comes with an electric deadbolt, go ahead and install that too. Just make sure it aligns properly with the door frame, so you get that extra layer of security. It’s worth taking a little extra time to ensure everything fits just right.
Lastly, don’t forget to mount the cable tension safety monitor on the door track. This little gadget helps keep an eye on the cable tension, which is crucial for preventing any mechanical failures down the line. It’s all about keeping things running smoothly and safely!
For added security, consider installing a wide-angle peephole on your garage door to easily identify visitors before opening.
Emergency Release Rope Installation
To set up the emergency release rope, you’ll need to attach it firmly to the designated release mechanism on the garage door opener. This rope allows manual door operation in power outages or malfunctions. Follow these steps for safe installation:
- Locate the emergency release handle on the opener trolley and thread the rope through its hole securely.
- Tie a large knot at the rope’s end to prevent slipping and attach a red plastic handle if provided for easy grip.
- Position the rope so it hangs at least six feet above the floor, within easy reach but out of children’s reach, and make certain it moves freely without obstruction.
Proper installation makes certain quick, safe manual door disengagement when needed. For enhanced safety, compliance with professional standards in installation and verification is recommended.
Electric Deadbolt Setup
Install the electric deadbolt by securely mounting it according to your model’s specifications, ensuring it integrates properly with the garage door opener system.
Begin by aligning the deadbolt mounting plate on the door or frame, then fasten it with the provided screws, making sure it’s flush and stable.
Connect the deadbolt’s wiring harness to the opener’s control board, following polarity and terminal markings carefully.
Test the locking mechanism electrically to confirm smooth engagement and release.
Next, install the emergency release handle or key switch near the deadbolt for manual operation during power outages.
Verify all connections are secure and insulated.
Finally, run a functional test by commanding the opener and observing the deadbolt’s synchronized locking action, ensuring it disengages promptly when the door operates.
For enhanced security and reliability, consider incorporating reinforced electronic deadbolts with hardened steel components to resist tampering and forced entry.
Cable Tension Safety Monitor
Make sure you hook up the cable tension safety monitor correctly to maintain proper cable tightness and prevent operational hazards. This monitor guarantees the cables stay taut and detect any slack that could compromise door function or safety. Follow these steps:
- Mount the tension monitor securely along the cable track, aligning it per the manufacturer’s instructions to accurately sense cable tension.
- Connect the monitor’s wiring to the opener’s safety terminal, guaranteeing solid and insulated connections to avoid signal loss.
- Test the system by manually releasing the emergency rope; the monitor should trigger an alert or stop the door if cable tension falls below safe limits.
Proper installation of the cable tension safety monitor protects your door’s operation and enhances overall safety compliance.
Program the Open and Close Limits on Your Garage Door Opener
Begin programming the open and close limits by pressing and holding the set button on your garage door opener until the LED displays a “1,” indicating the closing limit mode.
Use the down button to move the door to its fully closed position, then press the set button to save this limit.
Next, the LED will display “2,” signaling the open limit mode. Press the up button to raise the door to the fully open position, then press set to record this limit.
After setting both limits, the opener will automatically cycle the door to learn the force parameters.
Wait for the beep confirmation that programming is complete. Don’t test or adjust settings yet; those steps come after this programming phase to guarantee accurate limit configuration.
Test Your Garage Door Opener and Adjust Settings
Once you’ve programmed the open and close limits, operate the garage door using both the remote and wall console to verify smooth, complete travel in each direction.
After setting open and close limits, test the door with remote and wall controls for smooth, full movement.
Observe the door’s movement carefully to detect any binding or incomplete openings. If the door struggles or stops prematurely, adjust the upper and lower stops accordingly.
Next, test the safety sensors to confirm they reverse the door when obstructed. Finally, confirm all wiring is secure and components are firmly mounted to prevent operational issues.
- Cycle the door fully open and closed, noting any hesitation or noise.
- Trigger the safety sensor with an object to verify automatic reversal.
- Adjust limit settings slightly if door travel is uneven or motor strains.
These steps guarantee reliable, safe operation of your side mount opener.
Frequently Asked Questions
Can a Side Mount Opener Work With All Types of Garage Doors?
A side mount opener can work with most garage door types, but you need to make sure compatibility first.
It suits sectional and high-lift doors especially well, since it mounts beside the door rather than overhead.
However, very heavy or non-standard doors might require specific models or additional hardware.
Always check your door’s balance and structure, and consult the opener’s manual to confirm it supports your door type before installation.
How Noisy Is a Side Mount Garage Door Opener During Operation?
You’ll find a side mount garage door opener generally operates quieter than traditional overhead models because its motor mounts on the wall, reducing vibration transfer to the ceiling.
However, noise levels can vary based on door balance and proper installation. Ensuring the door is well balanced and securely mounting the opener with lag screws will minimize rattling and motor strain.
Also, check safety sensors and cable tension to prevent unnecessary operational noise.
What Maintenance Is Required for a Side Mount Garage Door Opener?
You’ll want to regularly lubricate the torsion shaft, drive coupler, and moving parts to reduce friction and noise.
Check cable tension and adjust the cable tensioner to keep the door balanced.
Inspect safety sensors and wiring for damage or misalignment, ensuring beams align horizontally.
Test the emergency release and electric deadbolt functionality.
Finally, tighten mounting brackets and screws to maintain secure installation and prevent motor strain.
Can I Install a Side Mount Opener Myself Without Professional Help?
Yes, you can install a side mount opener yourself if you’re comfortable with basic mechanical and electrical tasks.
Make sure the door is balanced and operational first. Follow your model’s manual precisely, use proper tools like a 10mm wrench, level, and pliers, and install components securely into studs.
Carefully wire the control and safety sensors, program limits accurately, and test all functions thoroughly. Take your time for safety and proper alignment.
Are There Compatibility Issues With Existing Garage Door Remotes?
Imagine trying to fit a new key into an old lock. It mightn’t turn smoothly.
Similarly, your existing garage door remotes may not be compatible with a side mount opener due to differing frequencies or rolling code technologies.
Check your opener’s manual to confirm remote compatibility.
If your current remotes don’t match, you’ll need to program new ones designed for your specific model to guarantee reliable operation and security.
Final Steps to a Secure Side Mount Garage Door Opener
Now that you’ve navigated the necessary steps, securing your side mount garage door opener should feel seamless and satisfying. Stay sharp by systematically testing and tweaking the settings to guarantee smooth, safe operation.
Remember, proper programming and precise placement prevent potential problems and promote peak performance. With patience and precision, your garage gateway will glide gracefully, granting you reliable, robust control every time you command it.