To reconnect your Kidde smoke alarm, first make certain it’s powered by turning the red wheel clockwise or mounting it to the base until you hear the musical tone and voice prompt.
Press and hold the button until two beeps sound and the alarm says “searching for other devices” to initiate wireless pairing.
When pairing is successful, release the button and confirm the green LED blinks every 60 seconds. If issues persist, you may need to reset wireless settings or hardwired units.
Explore further steps to optimize connection and testing.
Key Takeaways
- Power the Kidde smoke alarm by turning the red wheel clockwise or mounting it on the base until a musical tone and voice prompt occur.
- Press and hold the device button until two beeps and the voice prompt “searching for other devices” announces to start wireless reconnection.
- Wait for voice confirmation of successful pairing, then release the button to exit programming mode and confirm with green LED blinking every 60 seconds.
- If reconnection fails, reset wireless settings by holding the center button for 8–12 seconds until three beeps and a reset voice prompt occur.
- After reset, repeat the wireless connection procedure ensuring all devices are powered for proper network integration.
How To Power On Your Kidde Smoke Alarm?
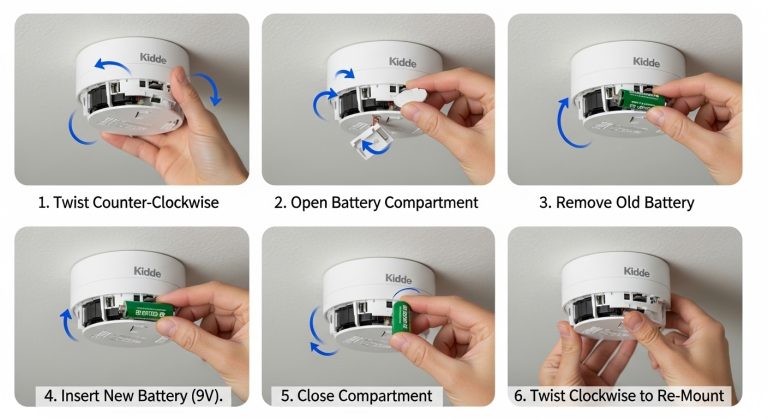
Start by turning the red wheel on the back of your Kidde smoke alarm clockwise to the on position using the tool provided in the QuickStart guide.
Begin by rotating the red wheel on your Kidde smoke alarm clockwise using the QuickStart tool.
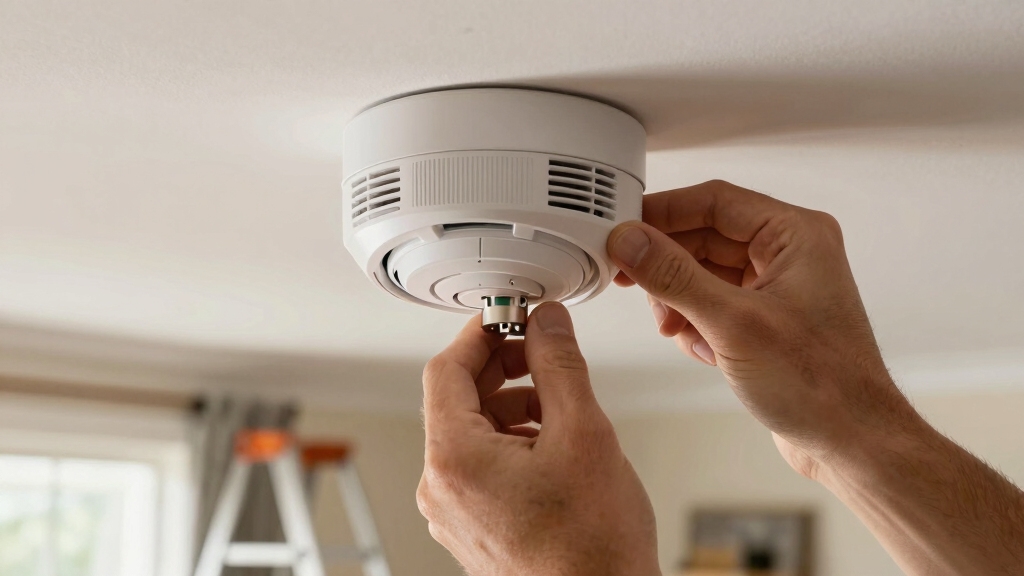
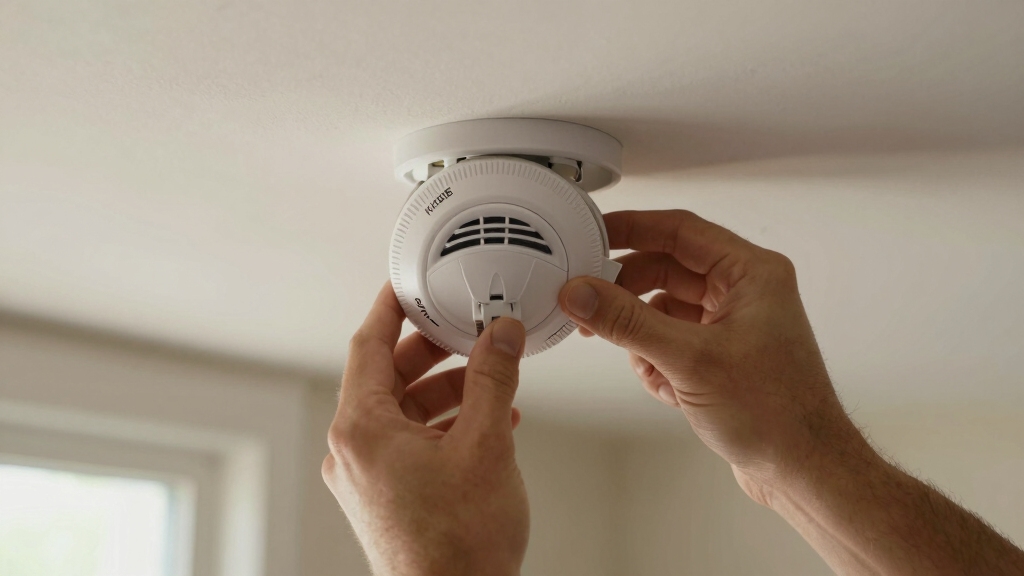
Next, mount the alarm onto its base and twist it fully until it locks in place, which automatically engages the power.
When powered, you’ll hear a musical tone indicating the battery activation. Shortly after, a voice prompt will say, “Ready to connect, follow quick start instructions,” confirming the device is operational.
In standby mode, observe the green LED blinking every 60 seconds to verify continuous power.
This sequence guarantees your Kidde smoke alarm is correctly powered and prepared for further setup or normal operation.
Always confirm these indicators before proceeding with any additional steps.
For uninterrupted operation, ensure your hardwired alarm has a battery backup installed to maintain functionality during power outages.
How To Connect Your Kidde Smoke Alarm Wirelessly?
Before connecting your Kidde smoke alarm wirelessly, make certain all devices are powered up to facilitate a smooth setup process.
Power the alarms by turning the red wheel clockwise or mounting the unit to its base until you hear the musical tone and voice prompt saying “ready to connect follow quick start instructions.”
To initiate the wireless connection, select one device and press the button until you hear two beeps and the voice announces “searching for other devices.” The device will scan and link with other powered units automatically.
Once the connection succeeds, a voice confirmation will announce the successful pairing. Release the button to exit programming mode.
Make sure all devices remain powered during this process to avoid connection failures and confirm the green LED blinks every 60 seconds in standby mode after setup.
Using the built-in test buttons after pairing helps verify each alarm is properly connected and functioning.
Add A New Kidde Smoke Alarm To Your Network
Next, you’ll need to put your coordinating unit into programming mode. This step is crucial for linking your new alarm. As you go through the process, keep an ear out for the voice prompts—they’ll confirm when the connection is successful. Happy connecting!
Be sure to perform a physical reset if needed, as some settings cannot be cleared remotely.
Powering Up New Device
Power up your new Kidde smoke alarm by turning the red wheel on the back clockwise to the on position using the tool provided in the QuickStart guide or by mounting the alarm to its base and twisting fully to engage power automatically.
Once powered, a musical tone confirms battery activation. The device will announce, “Ready to connect, follow QuickStart instructions,” signaling it’s in standby mode.
Observe the green LED blinking every 60 seconds, indicating proper operation. Make sure all devices in your network are powered before initiating wireless connection.
This initial powering step is essential for successful integration into your existing Kidde smoke alarm network, enabling seamless communication and synchronized alerts throughout your safety system.
Many Kidde alarms utilize sealed 10-year battery technology to ensure long-lasting, maintenance-free operation without the need for battery replacement.
Resetting Previously Used Alarm
After powering up your new Kidde smoke alarm and confirming it’s in standby mode, the next step is resetting any previously used alarms before adding them to your network.
To reset the wireless settings, press and hold the center button on the alarm for 8 to 12 seconds. You’ll hear three beeps, and the voice prompt will announce “resetting wireless settings.”
The light ring flashes green once, then pulses red, signaling the reset is complete. This process clears prior network connections, ensuring smooth integration with your existing system.
Make sure to repeat this reset on all used devices you plan to add. Once reset, the alarm will state “ready to connect follow quick start instructions,” confirming it’s prepared for network addition.
For optimal performance, regularly test your alarms and replace batteries annually or immediately on low-battery warnings to ensure continuous protection and avoid false alarms caused by weak power sources. replace batteries annually
Coordinating Unit Programming
Begin coordinating unit programming by ensuring the new Kidde smoke alarm is powered up, either by turning the red wheel clockwise or mounting it to its base.
If the device was previously used, perform a wireless settings reset by holding the center button for 8-12 seconds until three beeps confirm success.
Next, select your coordinating unit and press its button until you hear two beeps and the voice prompt “searching for other devices.” This puts the coordinator into programming mode.
The new alarm will automatically connect, confirmed by a voice notification. If the coordinator fails to connect, hold its button longer for a three-pulse reset, then repeat the process.
Once connected, release the button to exit programming mode and proceed with testing to verify network integration.
For optimal safety, ensure your smoke alarms are installed near bedrooms and key areas to maximize early warnings.
How To Reset Your Kidde Smoke Alarm’s Wireless Settings?
To reset your Kidde smoke alarm’s wireless settings, press and hold the center button on the smart smoke device for 8 to 12 seconds. You’ll hear three beeps confirming the reset.
Simultaneously, the voice prompt will state “resetting wireless settings,” while the light ring flashes green once and then pulses red. This sequence indicates the device has cleared its previous wireless connections and is ready for new programming.
After resetting, the alarm announces “ready to connect follow quick start instructions,” signaling you to initiate a fresh wireless setup.
Make sure the device is powered and in standby mode before starting this process. This reset is vital when troubleshooting network issues or preparing the device for integration into a new or existing wireless alarm network.
Regular testing of your smoke alarm using the built-in test button is recommended to confirm proper function and reduce the chances of false alarms caused by device malfunctions.
How To Reset Hardwired Kidde Smoke Alarms Properly?
Once you’ve restored power by turning the breaker back on, the next step is to press and release the test button on each hardwired Kidde smoke alarm. This kicks off the reset sequence.
You should hear a chirp followed by a beep pattern, which confirms that the reset was successful. Oh, and don’t forget to check that orange light—it should be on, indicating that the power is flowing.
It’s a good idea to repeat this process on all of the interconnected units. This way, you can ensure that the entire system resets properly. It’s better to be safe than sorry, right?
Before beginning any testing or resetting, remember to notify the central monitoring station to place the system in test mode and prevent false alarms.
Power Restoration Steps
When power is restored to your hardwired Kidde smoke alarms, you’ll need to reset them properly to guarantee they function correctly within your interconnected system.
Start by turning the breaker back on. Then press and release the test button on each alarm. You’ll hear a chirp followed by a beep sequence confirming the reset. An orange light indicates power presence.
Repeat this on all connected alarms to ensure full network functionality.
It is also important to verify that the backup batteries are properly installed and in good condition to prevent intermittent chirping after power restoration.
| Step | Action | Indicator |
|---|---|---|
| 1 | Turn breaker on | Power restored |
| 2 | Press and release test button | Chirp response |
| 3 | Listen for beep sequence | Reset confirmation |
| 4 | Check orange light | Power confirmed |
| 5 | Repeat for all alarms | Network reset complete |
Test Button Procedure
Pressing the test button on your hardwired Kidde smoke alarm initiates a sequence that verifies its reset and operational status.
After restoring power, press and release the test button once. The alarm will emit a chirp followed by a beep sequence, signaling a successful reset.
Observe the orange LED, which confirms power presence. This procedure must be repeated on all interconnected alarms to confirm the entire system resets properly.
Following the reset, press and release the test button again to confirm normal operation. The alarm should emit a full alert tone and then return to standby mode, indicated by a blinking green LED every 60 seconds.
Using fresh batteries alongside AC power guarantees accurate functionality and reliable performance of your Kidde smoke alarm system.
If the alarm continues to chirp after resetting, check the battery backup or consult a professional for further troubleshooting.
Interconnected Alarm Reset
Although interconnected hardwired Kidde smoke alarms share power and signals, each unit requires an individual reset to guarantee the entire system functions correctly.
After turning the breaker back on post-installation, press and release the test button on each alarm. You’ll hear a chirp response, followed by a beep sequence signaling a successful reset. The orange light confirms power presence.
Repeat this procedure on all interconnected alarms to make certain every unit resets properly. Once reset, verify operation by pressing the test button again; the alarm should sound, then return to standby mode.
Confirm that the green LED blinks every 60 seconds, indicating normal function. This systematic reset assures each device communicates accurately within the network, maintaining full system integrity and reliable alerting capability.
Testing Your Kidde Smoke Alarm
Regularly testing your Kidde smoke alarm guarantees it functions properly and keeps your home safe. To test, press and release the test button on the alarm.
The device emits a chirp, followed by a beep sequence confirming the alarm’s operational status. During this process, the orange light activates, indicating power presence.
After testing, the alarm returns to standby mode, signaled by a blinking green LED every 60 seconds. Make certain AC power is applied and batteries are fresh before testing to avoid false negatives.
Complete testing validates both the sensor and wireless connection if interconnected. Perform tests monthly to maintain reliability and promptly address any failure indications you observe during testing.
This systematic approach minimizes risks associated with malfunctioning alarms.
Troubleshooting Kidde Smoke Alarm Connection Issues
Ensuring your Kidde smoke alarm connects seamlessly within your network is key to maintaining all-encompassing home safety.
If connection issues arise, start by verifying power status and resetting wireless settings. Confirm all devices are powered before initiating pairing. Use the test button to check functionality after resets.
| Issue | Action | Confirmation |
|---|---|---|
| No power | Turn red wheel clockwise or mount base | Musical tone, voice prompt |
| Wireless not pairing | Hold button until two beeps | “Searching for other devices” |
| Connection reset needed | Press center button 8-12 sec | Three beeps, voice confirmation |
| Hardwired alarm fails | Turn breaker on, test button press | Orange light, beep sequence |
| Test failure | Replace batteries, retest | Green LED, normal standby |
Follow these steps precisely for reliable reconnection.
Frequently Asked Questions
How Often Should I Replace the Batteries in My Kidde Smoke Alarm?
You should replace the batteries in your Kidde smoke alarm at least once a year to guarantee reliable operation. Always use fresh, high-quality batteries, preferably lithium or alkaline, as recommended by the manufacturer.
Additionally, test your alarm monthly by pressing the test button to confirm proper function.
If your alarm emits low battery chirps, replace the batteries immediately to maintain safety and avoid false alarms or device failure.
Can I Use Third-Party Batteries With My Kidde Smoke Alarm?
You shouldn’t use third-party batteries in your Kidde smoke alarm.
Kidde recommends using only their specified batteries to guarantee reliable power and proper functionality.
Third-party batteries may have inconsistent voltage or chemical composition, potentially causing false alarms or device failure.
To maintain peak safety and performance, always install fresh, manufacturer-approved batteries and replace them according to Kidde’s guidelines.
This guarantees your alarm operates as designed during emergencies.
What Is the Lifespan of a Kidde Smoke Alarm?
You should replace your Kidde smoke alarm every 10 years. Every component wears, every sensor degrades, and every battery drains.
Over time, dust and humidity can affect its sensitivity, reducing its effectiveness.
Regularly test your alarm monthly, change batteries annually, and monitor for error signals.
Staying proactive guarantees your device maintains peak performance and continues to protect your home reliably throughout its expected lifespan.
How Do I Clean and Maintain My Kidde Smoke Alarm?
You should clean your Kidde smoke alarm monthly by gently vacuuming around the sensor and vents using a soft brush attachment.
Avoid spraying cleaners or water directly on the unit. Test the alarm after cleaning by pressing the test button to guarantee functionality.
Replace batteries annually or when low battery chirps sound. Keep the alarm free from dust, paint, or debris to maintain accurate detection and peak performance.
Are Kidde Smoke Alarms Compatible With Home Automation Systems?
Kidde smoke alarms typically don’t offer native compatibility with most home automation systems. However, you can integrate them indirectly using smart home hubs or third-party devices that support Zigbee, Z-Wave, or Wi-Fi protocols.
To achieve seamless control, you’ll need compatible interfaces or modules designed for alarm monitoring. Always verify your specific Kidde model’s capabilities and supported communication protocols before attempting integration with your home automation setup.
Complete Your Setup for Ultimate Peace of Mind
To reconnect your Kidde smoke alarm, power it on and establish a wireless connection or integrate it into your network. Reset wireless or hardwired settings as needed, then test the alarm to confirm functionality.
If issues arise, troubleshoot methodically by checking power sources, network signals, and device compatibility. By following these steps precisely, you guarantee reliable alerts, seamless communication, and peak safety.
Stay proactive, stay connected, and keep your home protected effectively.