To test your garage door sensors, first check their LED lights: a solid light means power’s on, and steady green confirms correct alignment.
Press the “Test” button on smart sensors to verify communication. Inspect wiring for damage or loose connections, ensuring power supply is stable.
Perform a safety reversal test by placing an object in the sensor path to confirm the door reverses properly.
These steps help pinpoint issues before adjusting or cleaning sensors for peak performance.
Key Takeaways
- Verify sensor power by checking for a solid LED light and press the “Test” button on smart sensors to confirm communication.
- Ensure both sensors are mounted at the same height, level, and aligned until LEDs show a steady green light.
- Clean sensor lenses with a damp microfiber cloth and remove any obstructions blocking the infrared beam path.
- Inspect wiring for damage or loose connections by gently moving wires and checking for flickering LEDs.
- Perform the safety reversal test by placing an object in the sensor path and confirming the door reverses automatically.
Checking LED Lights to Diagnose Garage Door Sensor Power and Alignment
Checking the LED lights on your garage door sensors provides a quick and reliable method to assess their power status and alignment. Each sensor should display a solid LED light when powered correctly.
A steady green light indicates proper alignment, while blinking or no light suggests issues. If the LEDs are off or flickering, check for loose wiring, tripped breakers, or damage near connection points.
For smart sensors, press the “Test” button; the LED should blink in response, confirming power and communication. Address any power interruptions or connection faults promptly to maintain sensor functionality.
This inspection helps you quickly identify whether sensors receive power and are aligned without requiring further adjustments at this stage. Remember to unplug the garage door opener before inspecting wiring to ensure safety and avoid electrical hazards.
Adjusting Garage Door Sensor Alignment and Leveling
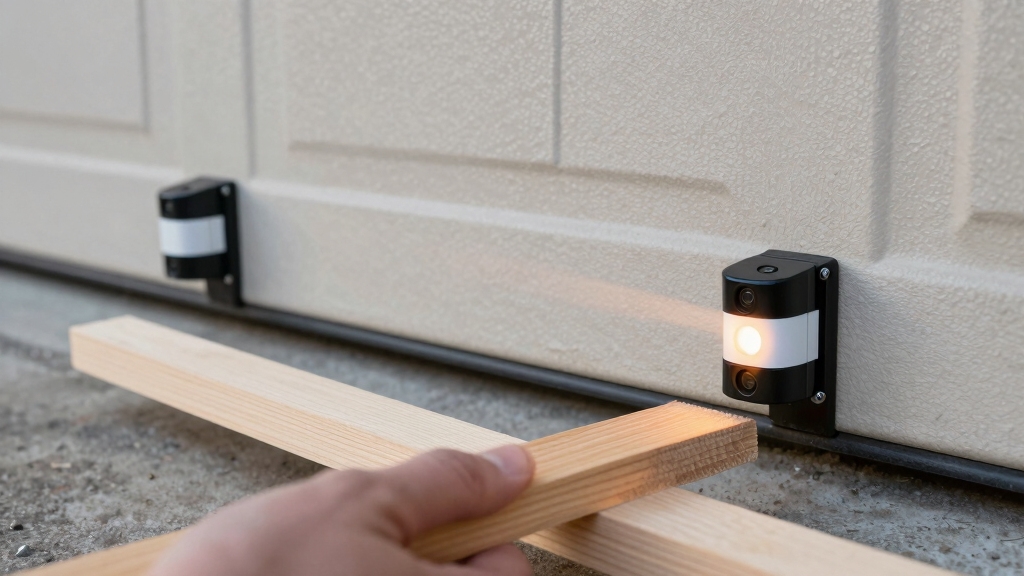
To fine-tune your garage door sensors, start by ensuring both units are mounted at the exact same height and perfectly level. Use a laser level or bubble level to verify their vertical alignment.
Begin fine-tuning garage door sensors by mounting both units precisely level and at the same height.
Check that the brackets holding the sensors are tight and secure, as looseness causes misalignment. Tie a string between the sensor lenses and position a beam level on the string to confirm they’re horizontally level across the lens centers.
Adjust the sensors slowly until the LED lights on both units show a steady, solid glow. This indicates proper alignment. Even a slight tilt or height difference interrupts the infrared beam, causing malfunction.
Once aligned, test the door operation to confirm the sensors respond correctly without triggering false reversals or failures. Regular inspection and cleaning of sensor lenses with a soft microfiber cloth help maintain infrared beam communication and prevent false alerts.
Cleaning Garage Door Sensor Lenses and Removing Obstructions
Keep garage door sensor lenses clean and free from obstructions to guarantee reliable operation.
Start by wiping the lenses with a damp cloth, removing dirt, dust, spider webs, or mud without disturbing sensor alignment.
Carefully inspect the beam path between sensors and clear any objects blocking the infrared signal.
Items like boxes or debris can interrupt the sensor’s function, so make certain the area remains clear.
Avoid using abrasive materials or harsh chemicals that could scratch or damage the lenses.
Regularly perform this cleaning to maintain sensor sensitivity and prevent false readings.
Disconnect power before maintenance to ensure safety and prevent accidental activation, as recommended for proper sensor maintenance.
Inspecting Garage Door Sensor Wiring and Power Supply
Inspect garage door sensor wiring for signs of damage, loose connections, or wear that could disrupt power flow.
Carefully trace wires from the sensors to the motor unit, checking for frayed insulation, corrosion, or water damage.
Gently move wires to detect intermittent connection issues, indicated by flickering sensor LED lights.
If you find damaged wires, replace or repair them promptly.
Next, verify the power supply by plugging another device into the garage outlet to confirm voltage presence.
Check the circuit breaker for tripped switches and reset if necessary.
Make certain sensor wires are securely connected to the automatic opener hardware, wearing gloves and turning off power before handling.
Proper wiring and a stable power supply are critical for reliable sensor operation and garage door safety.
Power surges and voltage spikes can cause sensor wiring faults and erratic door behavior, so consider installing surge protection to prevent damage and false signals.
Performing a Safety Reversal Test on Garage Door Sensors
Perform a safety reversal test by placing a non-breakable object, such as a cardboard box or broom handle, directly in the sensor path while closing the garage door. The door should automatically reverse upon sensing the object. If it doesn’t, you need to troubleshoot sensor alignment, wiring, or power supply issues.
Repeat the test multiple times to ensure a consistent response. This quick, no-cost test helps maintain safety.
Always ensure to clear the doorway of objects, pets, and people before testing to prevent injury or damage during the safety reversal test.
| Step | Action | Expected Result |
|---|---|---|
| 1 | Place object in sensor path | Door reverses automatically |
| 2 | Close door with object present | Door stops and reverses |
| 3 | Remove object | Door closes without issues |
| 4 | Repeat test multiple times | Consistent reversal response |
| 5 | If failure occurs | Inspect alignment and wiring |
Frequently Asked Questions
How Often Should Garage Door Sensors Be Replaced?
You should replace garage door sensors only when they fail consistent safety reversal tests or show persistent issues like unresponsive LEDs, alignment problems, or wiring damage that can’t be repaired.
Sensors typically last several years with proper maintenance. Regular monthly testing and cleaning help you catch problems early, extending sensor life.
Don’t replace just because of minor glitches. Focus on clear sensor failure or repeated safety hazards before investing in new units.
Can Weather Conditions Affect Sensor Performance?
Oh sure, you’d want your garage door sensors to perform flawlessly during storms, right?
Weather conditions like rain, snow, fog, or extreme cold can seriously affect sensor performance by causing lens fogging, dirt accumulation, or misalignment from wind.
To keep sensors reliable, regularly clean lenses, check alignment, and inspect wiring for moisture damage.
Taking these steps helps maintain proper sensor function despite unpredictable weather challenges.
Are All Garage Door Sensors Universally Compatible?
No, not all garage door sensors are universally compatible. You need to match sensors with your specific garage door opener model and brand.
Different manufacturers use varying frequencies, wiring configurations, and communication protocols. Installing incompatible sensors can cause malfunction or prevent the door from reversing properly.
Always consult your opener’s manual or manufacturer to make certain the sensors you buy will integrate correctly, maintaining safety and reliable operation.
What Tools Are Needed for Sensor Installation?
You’ll need more than a magic wand for sensor installation.
Grab a laser or bubble level to get perfect alignment, a screwdriver set to tighten brackets, and wire strippers for clean connections.
Don’t forget a voltage tester to verify power’s flowing and a damp cloth for lens cleaning.
These tools help you install sensors precisely, avoiding misalignment or loose wiring that kills functionality.
Gloves and a ladder round out your kit.
How Do I Know if My Sensor Is Smart-Enabled?
You’ll know your sensor is smart-enabled if it has a “Test” button that triggers the LED light to blink when pressed.
Smart sensors often feature LED indicators that respond actively to commands, unlike standard sensors with static lights.
Check your user manual or product specs for smart features like app connectivity or remote diagnostics.
If the LED blinks upon testing and you can control it via an app, it’s smart-enabled.
Stay Safe with Well-Maintained Garage Door Sensors
By routinely giving your garage door sensors a little TLC, you’re keeping your system running smoothly and safely. Check those LED lights, fine-tune alignment, clear lenses, and ensure solid wiring.
Think of these steps as gentle reminders rather than chores. A quick safety reversal test wraps it up, confirming everything’s in tip-top shape.
With this hands-on approach, you’re not just maintaining sensors; you’re safeguarding your home’s everyday rhythm with precision and care.