To reset a First Alert smoke alarm, first identify its model and disconnect all power sources. Remove batteries for battery-powered units or unplug wiring and backup battery for hardwired alarms.
Press and hold the test button for 15–30 seconds until chirps stop. Then reinstall power and test the alarm. For smart models like SC5 or Onelink, use specific button sequences to clear settings.
Confirm functionality by triggering the alarm. Understanding these steps secures proper resets and reliable operation. Further guidance covers advanced models and maintenance.
Key Takeaways
- Remove the battery or disconnect power before starting the reset to ensure total power isolation.
- Press and hold the test button for 15–30 seconds to drain residual power and trigger reset chirps.
- Reinsert the battery or restore power after draining, then press the test button to confirm alarm functionality.
- For factory reset, hold the test button while sliding the battery tray back until you hear a beep sequence.
- Smart models require specific reset sequences, such as holding the center button or pressing test/reset multiple times.
How to Identify Your First Alert Smoke Alarm Model?
Start by locating the model number on your First Alert smoke alarm, typically found on the back or inside the battery compartment.
This alphanumeric code is vital for identifying your specific device and accessing model-specific reset instructions.
If the number is faded, clean the area gently to improve legibility.
Note the exact sequence, as variations determine reset procedures and compatibility with power sources or smart home systems.
Cross-reference this model number with the user manual or First Alert’s official website to confirm features like battery type, hardwired status, or wireless connectivity.
Accurately identifying your model guarantees you follow the correct reset method, maintain proper functionality, and comply with safety standards.
Never guess the model; precise identification is foundational for effective maintenance and troubleshooting.
Additionally, understanding the battery replacement timing for your model helps ensure the alarm remains fully operational and safe.
How to Quickly Reset Battery-Powered First Alert Smoke Alarms?
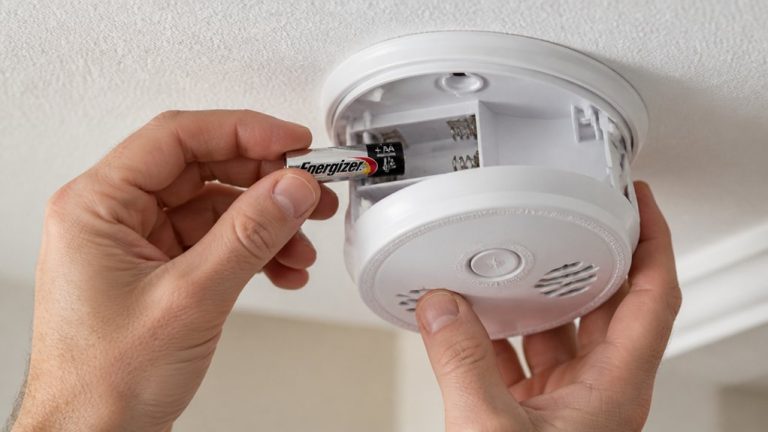
To quickly reset your battery-powered First Alert smoke alarm, first, go ahead and take out the battery.
Then, press the test button for about 15 to 30 seconds. This helps drain any leftover power. You should hear a few chirps, which means the reset was successful.
Once you’ve done that, simply put the battery back in. After resetting, it’s a good idea to press the test button again. This way, you can confirm that the alarm sounds loudly and is working properly. Safety first, right?
Remember to replace your smoke alarm every 10 years to maintain optimal sensor sensitivity and ensure reliable detection.
Quick Reset Steps
You can quickly reset a battery-powered First Alert smoke alarm by first removing its battery.
Then press and hold the test button for 15 to 30 seconds to drain residual power.
This step clears stored electrical charge, ensuring the unit fully resets.
After holding the button, you may hear a few chirps, which indicate the reset was successful.
Once chirping stops, reinsert the battery carefully, making sure it’s seated correctly.
This procedure effectively clears any false alarms or error states caused by residual voltage.
Avoid powering the unit during this process to prevent incomplete resets.
Following these quick reset steps helps maintain the alarm’s responsiveness without requiring more complex factory resets or professional assistance.
Always handle the battery and test button with care to avoid damage.
For continuous operation, it is important to regularly test and replace the backup batteries as recommended to ensure the alarm functions properly during power outages.
Post-Reset Confirmation
After completing the quick reset procedure on your battery-powered First Alert smoke alarm, verify its functionality by pressing the test button to trigger a loud alarm sound.
This confirms that the internal circuitry has properly reset and the battery is supplying adequate power.
Listen for a clear, consistent alarm tone; any faint chirping may indicate low battery or incomplete reset.
If chirps persist, silence them as per manufacturer guidelines or replace the battery to avoid false alarms.
Make sure the test button responds immediately, indicating the unit’s readiness to detect smoke.
Performing this post-reset confirmation is vital for maintaining operational safety and compliance.
Always follow model-specific instructions to guarantee the smoke alarm functions reliably after a reset.
Regular testing and maintenance, including monthly checks, help ensure smoke alarm reliability over time.
How to Reset Hardwired First Alert Smoke Alarms?
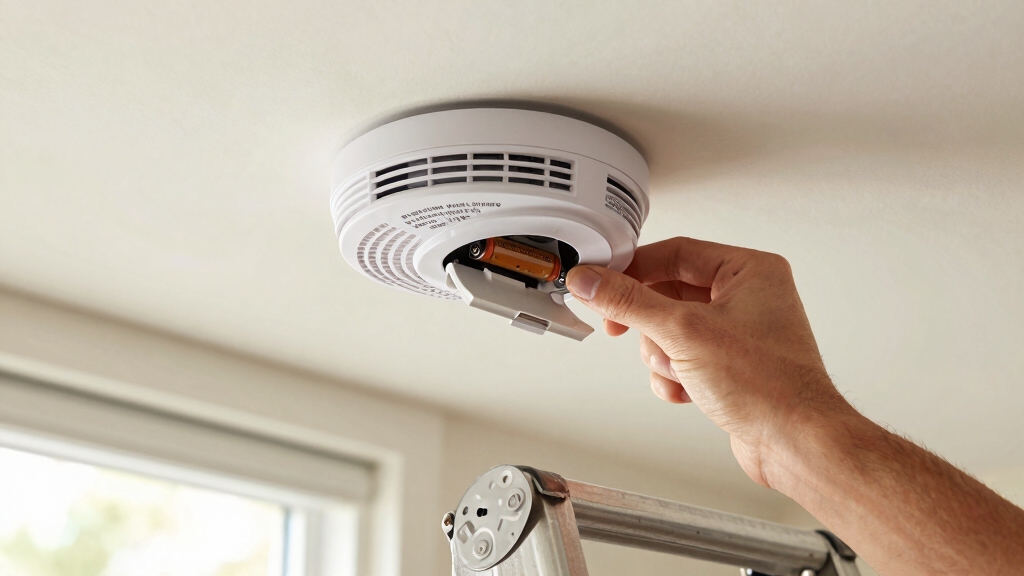
To reset a hardwired First Alert smoke alarm, you’ll want to start by disconnecting the power source. If your alarm has a backup battery, go ahead and remove that too.
Once you’ve done that, press and hold the test or silence button for about 20 seconds. This helps clear any residual charge in the system.
After that, simply reconnect the power. Don’t forget to test the alarm afterward to make sure everything is working properly. It’s a quick process, and it’s always good to ensure your smoke alarm is functioning as it should!
For safety, always ensure you maintain steady footing and avoid sudden movements if you need to use a ladder or tool to reach your alarm.
Power Disconnection Steps
Begin by disconnecting the hardwired First Alert smoke alarm from its power source to safely initiate the reset process.
Locate the wiring harness or power connector attached to the alarm and carefully unplug it to cut electrical flow. If the unit includes a backup battery, remove it to guarantee total power isolation.
With all power sources disconnected, press and hold the test or silence button for approximately 20 seconds to drain residual energy within the device. This step is essential to fully reset the internal circuitry.
After completing the button press, reconnect the wiring harness and reinsert the battery if applicable.
Once reconnected, test the alarm by pressing the test button to verify full operational status and confirm the reset was successful.
For uninterrupted safety, always ensure the backup battery is functional as it provides backup power during outages.
Battery Removal Process
Locate the battery compartment on your hardwired First Alert smoke alarm and carefully remove the battery to fully isolate the unit’s power source. This step is essential to interrupt any residual power flow within the device.
After battery removal, press and hold the test or silence button for approximately 20 seconds to drain any remaining electrical charge. This action guarantees the alarm’s internal circuitry resets completely.
Once you’ve held the button long enough, verify that the unit is fully powered down before reconnecting the battery. Reinstall the battery securely, confirming proper orientation and connection.
This process effectively prepares the hardwired alarm for a clean reset cycle once power is restored. Avoid reinserting the battery prematurely to prevent incomplete resetting or false alarms.
Always ensure power is turned off at the circuit breaker and verified with a non-contact voltage detector before beginning any maintenance on hardwired alarms.
Test and Verification
How do you confirm that your hardwired First Alert smoke alarm has reset correctly?
After disconnecting power and removing the battery, press and hold the test or silence button for 20 seconds to drain residual charge.
Reconnect power sources and reinsert the battery if applicable.
To verify the reset, press the test button firmly.
A loud, continuous alarm indicates successful function restoration.
If the alarm chirps persist, silence them following the manufacturer’s instructions.
Confirm no low-battery or error signals remain.
This precise testing guarantees the alarm’s circuitry and sensors operate correctly post-reset.
Always conduct this verification immediately after resetting to guarantee your hardwired First Alert smoke alarm maintains reliable, uninterrupted protection.
Regular testing at least once a month is recommended to ensure proper operation and early detection of any low battery power issues.
How to Perform a Factory Reset on First Alert Smoke Alarms?
To perform a factory reset on your First Alert smoke alarm, start by removing the battery or cutting the power supply to the unit.
Next, press and hold the test button on the front of the alarm. While holding the button, slide the battery tray back into place.
Continue holding the button until you hear a short beep followed by a long beep. The long beep confirms the factory reset is complete.
Release the test button immediately after the long beep. This procedure clears all stored data and resets the unit to its original factory settings.
After the reset, reinstall the battery or restore power, then press the test button to verify the alarm functions correctly. This method applies to standard First Alert models excluding smart and Z-Wave variants.
For added reliability, it is recommended to perform monthly maintenance by testing the alarm regularly.
How to Reset Smart First Alert Alarms (SC5 & Onelink)?
Standard factory reset procedures don’t apply to smart First Alert alarms like the SC5 and Onelink models, as they require specific steps due to their advanced connectivity features.
To reset the SC5, hold the center button for 20 to 30 seconds until the halo LED turns red, indicating a factory reset. For Onelink models, press the Test/Reset button five times rapidly to unpair the device and complete the factory reset.
After these actions, reboot the device by holding the center button. These steps guarantee the alarm’s network settings and pairing information are fully cleared, essential for troubleshooting or reconfiguring your smart alarm system.
Follow the exact timing and button sequences to avoid incomplete resets that could affect performance. Proper placement and maintenance ensure your alarm system functions reliably after resetting, maintaining optimal early warnings for your safety.
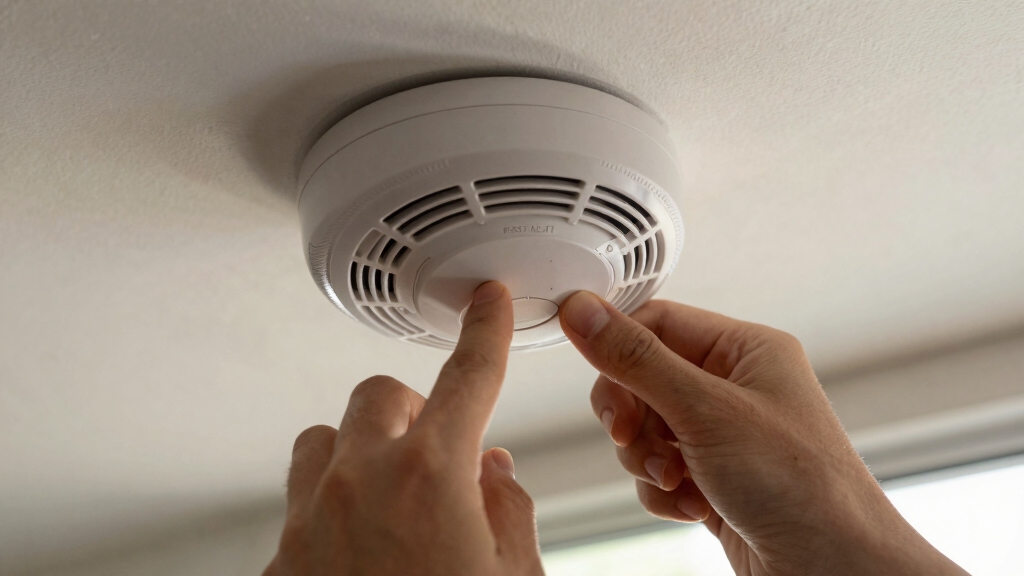
How to Verify Your First Alert Smoke Alarm Works After Reset?
Once you’ve completed the reset process, check your First Alert smoke alarm’s functionality by pressing the test button.
Hold it firmly until the alarm sounds loudly and continuously. A strong, clear alarm confirms the device is operational.
If you hear only chirps or no sound, verify battery installation and power connection, then repeat the reset.
For smart or Z-Wave models, ensure network settings are restored and the alarm appears correctly in your system.
If low-battery chirps persist, silence them according to your model’s instructions.
Always consult the manufacturer’s manual for model-specific verification steps.
Performing this test after reset guarantees your smoke alarm will respond properly in an emergency, assuring your safety and compliance with safety standards.
Frequently Asked Questions
How Often Should I Reset My First Alert Smoke Alarm?
You should reset your First Alert smoke alarm only when necessary, such as after replacing the battery, clearing false alarms, or troubleshooting malfunctions.
Regularly test it monthly to guarantee proper function, but frequent resets aren’t required.
If persistent issues occur, perform a factory reset following model-specific instructions.
Avoid resetting as routine maintenance; instead, focus on timely battery replacement and testing to keep your alarm reliable and compliant with safety standards.
Can Resetting My Alarm Affect Warranty Coverage?
Resetting your First Alert smoke alarm following manufacturer instructions generally won’t void your warranty.
However, improper handling, unauthorized tampering, or using non-approved components during reset procedures can affect coverage. Always perform resets exactly as specified in the user manual.
If you’re unsure, consult First Alert support before proceeding. Maintaining proper documentation of your reset actions helps protect your warranty rights and guarantees compliance with their terms and conditions.
What Should I Do if the Alarm Keeps Chirping After Reset?
If your alarm keeps chirping after reset, first make sure the battery is fresh and properly installed.
Check for dust or debris inside the unit and clean it carefully.
Verify that the alarm is correctly reconnected to power if hardwired.
Persistent chirping may indicate the device needs replacement or professional inspection.
Follow the manufacturer’s troubleshooting guide precisely.
If issues persist, contact First Alert support for further assistance.
Are Reset Procedures Different for Carbon Monoxide Detectors?
Picture the blinking lights and faint beeps of your carbon monoxide detector.
Yes, reset procedures differ slightly from smoke alarms. CO detectors often require you to press and hold the test/reset button longer or follow model-specific steps like removing the battery or power and waiting for distinct beep patterns.
You need to follow precise instructions, as CO units might include additional steps to clear memory or network settings. This ensures accurate, reliable operation.
How Do I Reset a First Alert Z-Wave Smoke Alarm?
To reset your First Alert Z-Wave smoke alarm, hold the test button for at least 10 seconds to reset Z-Wave settings and remove it from the network.
For some models, remove the battery tray, press and hold the reset button, then slide the tray back in until you hear a beep.
This process resets the device, which may appear as two separate devices: smoke and CO in your system.
Always confirm functionality afterward.
Keep Calm and Let Your Alarm Guard You
Now that you know how to reset your First Alert smoke alarm, you’re ready to keep your home safe. No need to summon a telegram for help.
Whether battery-powered, hardwired, or smart, following these steps guarantees your alarm functions flawlessly. Always verify proper operation after resetting, as a working smoke alarm is critical for early fire detection.
Stay vigilant and maintain your device regularly to protect your household with confidence and precision.