To reset your garage door sensor, first unplug the opener or switch off its breaker to cut power safely and discharge residual electricity.
Next, clean the sensor lenses with a soft cloth and check for damage or loose wires. Realign both sensors so they face each other directly without obstructions, then restore power.
Confirm sensors show solid, steady lights and that the door closes smoothly. If problems persist after these steps, further guidance can help you troubleshoot effectively.
Key Takeaways
- Turn off power to the garage door opener by unplugging it or switching off the circuit breaker before maintenance.
- Clean sensor lenses gently with a soft cloth and ensure sensors face each other directly without obstructions.
- Loosen and adjust mounting brackets to align sensors perfectly, then tighten brackets to secure their positions.
- Restore power and check sensor indicator lights; steady lights indicate correct alignment and function.
- Test door operation for smooth closing without reversing; call a professional if lights remain abnormal after resetting.
Safely Cut Power Before Sensor Maintenance
Before performing any maintenance on your garage door sensor, make sure you safely cut power to the opener. Start by unplugging the garage door opener from the power outlet.
Begin by disconnecting the garage door opener from its power source for safety.
Next, locate the corresponding breaker in your electrical panel and switch it off to fully disconnect electrical supply.
Wait 30 to 60 seconds to allow any residual electrical charge in the system to discharge completely. This step prevents electrical shock and guarantees your safety while working on the sensor.
It also facilitates a system reset by clearing any transient electrical states. Never attempt sensor maintenance without cutting power first, as live circuits pose a significant hazard.
Following these precautions guarantees a safe and effective starting point before proceeding with any sensor adjustments or repairs.
Using a surge protector can further safeguard your garage door opener’s electronics during maintenance and prevent damage from voltage spikes.
Clean and Inspect Garage Door Sensors
Regularly clean and inspect your garage door sensors to ensure reliable operation. Dirt, dust, and spider webs can obstruct the sensor lenses, causing malfunction or false door reversals.
Gently wipe both sensor lenses with a soft, dry cloth. If grime persists, use warm water or mild soap. Avoid harsh chemicals that may damage lenses.
During inspection, check for visible cracks or damage on sensor housings. Look for loose or frayed wiring connections. Ensure proper sensor mounting without excessive movement.
Address any physical damage or wiring issues before proceeding. Keeping sensors clean and intact ensures accurate beam transmission, preventing operational errors and enhancing safety.
Perform this maintenance routinely to maintain sensor functionality and avoid unnecessary resets. It is also important to realign sensors carefully if misaligned to restore proper operation and safety.
Align Sensors for Proper Operation
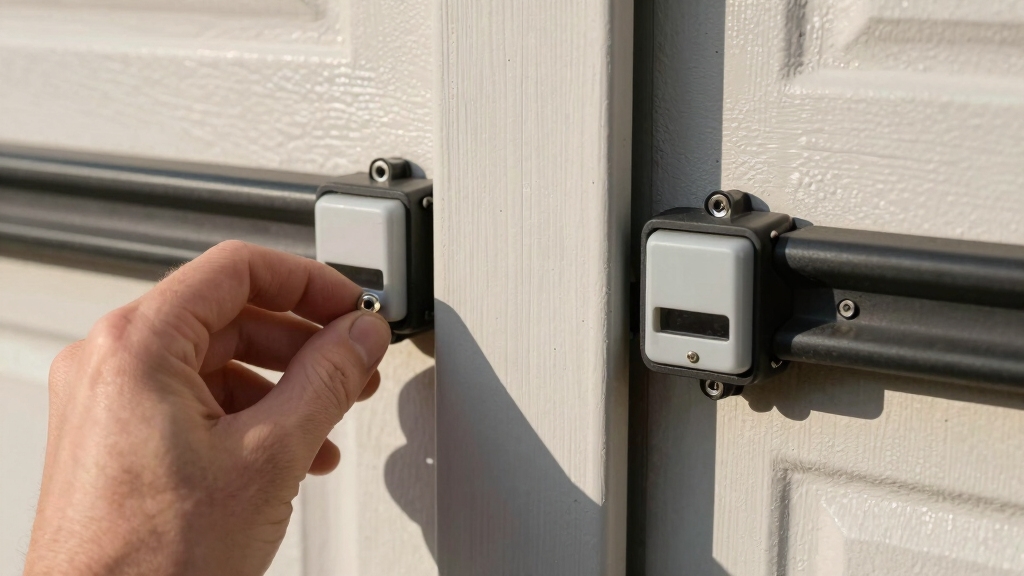
To get your sensors working properly, you’ll want to position them so that they face each other directly.
Start by loosening the mounting brackets, which will allow you to make any necessary adjustments.
Now, keep an eye on those indicator lights! You should see one glowing green and the other amber—that’s your sign that they’re aligned just right.
Once those lights are steady, go ahead and tighten the brackets to secure the sensors in place.
If the sensor lights remain off after alignment, it may indicate an underlying wiring defect that requires professional inspection.
Sensor Positioning Tips
When aligning your garage door sensors, make sure both units face each other directly and their indicator lights show steady illumination. This guarantees the safety beam functions correctly, preventing accidental door closure.
Loosen the mounting brackets slightly to adjust sensor angles for precise alignment. Once aligned, tighten the brackets to secure their position. Pay attention to sensor height and avoid obstructions that could block the beam.
Position sensors 4-6 inches above the ground for peak detection. Make sure no objects or debris interrupt the sensor’s line of sight. Keep sensors firmly mounted on stable surfaces to prevent shifting over time.
Proper sensor positioning guarantees reliable operation and reduces false triggers or system errors during your garage door’s use. For enhanced security, consider integrating sensors with magnetic/contact sensors that detect door openings and trigger alerts.
Indicator Light Signals
Aligning your garage door sensors properly guarantees their indicator lights provide clear signals about system status. Position each sensor directly facing the other, then loosen the mounting brackets to adjust their angles.
Once aligned, the indicator lights will display steady illumination; typically, one sensor shows a green light while the other glows amber. This steady glow confirms the sensors are communicating correctly.
If either light blinks or remains off, realign the sensors or check for obstructions like dirt or spider webs on the lenses. After securing proper alignment, tighten the brackets to maintain position.
Finally, restore power and observe the lights. Solid, steady lights indicate the system is ready. Blinking or inconsistent lights suggest further troubleshooting or professional inspection is necessary.
Proper maintenance and periodic inspection of sensors help ensure consistent operation and prevent safety hazards.
Restore Power and Check Sensor Lights
After you’ve made those adjustments to the sensors, go ahead and plug the garage door opener back into the power outlet or, if needed, reset the breaker to get the power flowing again.
Once that’s done, keep an eye on those sensor lights. If they glow steadily, that usually means everything’s aligned and working as it should.
But hey, if the lights are blinking or just staying off, it looks like we might need to troubleshoot a bit more to get those sensors back in shape.
No worries, we’ll figure it out! Make sure to verify the power on the load wires feeding the sensors to ensure proper voltage and function.
Power Restoration Steps
Plug your garage door opener back into the power outlet or reset the corresponding breaker to restore electricity. Once power is restored, immediately observe the sensor lights to make sure they’re functioning correctly.
A solid, steady glow typically indicates proper operation, while blinking lights may signal issues needing further attention.
Follow these steps to verify power restoration:
- Check that both sensors emit a steady light without flickering.
- Test the garage door’s movement; it should close smoothly without reversing.
- Confirm no unusual noises or delays occur during operation.
If the door doesn’t respond as expected, re-examine the power connection and sensor wiring before proceeding with additional troubleshooting or resets.
Be aware that sparking or discoloration at the power outlet can indicate electrical faults that require professional inspection.
Sensor Light Indicators
Typically, sensor lights provide clear visual cues about your garage door system’s status once power is restored. After plugging the opener back in or resetting the breaker, check the sensor lights.
A solid glow means proper alignment and functioning. Blinking or no lights signal misalignment, wiring issues, or sensor faults. Use the table below to interpret sensor light behavior and next steps.
| Sensor Light Status | Meaning | Action Required |
|---|---|---|
| Solid Green & Amber | Sensors aligned properly | Test door operation |
| Blinking Lights | Misalignment or fault | Re-align sensors or inspect wiring |
| No Lights | Power or wiring issue | Check power, wiring, or replace sensor |
| Intermittent Glow | Loose connection | Tighten mounting brackets and wiring |
Follow these indicators to troubleshoot effectively. Proper placement and alignment of sensors are crucial for reliable operation, similar to how proper peephole installation ensures clear viewing and security.
Reset Your Garage Door Sensors to Fix Errors
When your garage door sensors show errors, resetting them can quickly restore proper function. Start by cutting power to the opener to guarantee safety and clear electronic faults.
Resetting your garage door sensors by cutting power can swiftly fix errors and restore proper operation.
Then clean and realign the sensors to eliminate obstruction or misalignment issues. Finally, restore power and verify sensor status.
Follow these steps:
- Power Cutoff: Unplug the opener or turn off its breaker; wait 30-60 seconds to discharge electronics.
- Sensor Cleaning and Alignment: Wipe lenses with a soft cloth, adjust brackets so sensors face each other with steady indicator lights.
- Power Restoration and Testing: Plug in or reset breaker, confirm solid sensor lights, then test door operation ensuring it closes smoothly without reversing.
Regular maintenance and cleaning prevent dust buildup that can interfere with sensor function. This method efficiently resets sensors and resolves common sensor errors.
Troubleshoot Sensor Issues and Know When to Call a Pro
Although many sensor issues can be resolved through cleaning, alignment, and resetting, you should troubleshoot wiring and indicator lights if problems persist.
Start by unplugging the opener and checking sensor wires for damage or loose connections.
Inspect the indicator lights: solid lights mean proper function, while blinking or off lights signal faults.
Consult your model’s manual for specific LED codes.
If wires are intact and lights remain abnormal after resetting, avoid further DIY attempts.
Persistent sensor malfunctions often indicate hardware failure or complex electrical faults.
In these cases, call a professional technician to diagnose and repair the system safely.
Regular maintenance helps prevent issues, but don’t hesitate to seek expert help to guarantee reliable garage door operation.
Keep in mind that professional service calls for emergencies often include emergency surcharges, which can significantly affect your total cost.
Frequently Asked Questions
Can I Reset Garage Door Sensors Without Unplugging the Opener?
No, you generally can’t reset garage door sensors without unplugging the opener or cutting power. Disconnecting power guarantees safety and allows the system to fully reset.
However, you can try pressing the Learn or Reset button on the opener to clear sensor connections, but this doesn’t replace a full power reset. For best results, always unplug or turn off the breaker before resetting sensors to avoid electrical issues and guarantee proper sensor function.
How Do I Know if My Remote Needs Reprogramming After a Reset?
You’ll know your remote needs reprogramming after a reset if it no longer operates the garage door.
Pressing the remote buttons won’t trigger any response from the opener.
After holding the reset button for 5-10 seconds, the opener erases previous remote connections.
To restore function, follow your opener’s manual to reprogram each remote.
Without reprogramming, the remote won’t communicate with the garage door opener.
What Causes Sensor Lights to Blink Intermittently After Alignment?
Intermittent blinking of sensor lights after alignment usually means misalignment, dirty lenses, or wiring issues.
First, check that sensors face each other directly and indicator lights are steady.
Clean lenses gently to remove dust or debris.
Inspect sensor wiring for damage or loose connections.
If blinking persists, power cycle the opener and verify proper sensor function.
Persistent blinking often signals hardware faults requiring professional service.
Are There Universal Replacement Sensors for All Garage Door Openers?
About 70% of garage door openers use proprietary sensors, so you won’t find universal replacement sensors that fit all models.
You’ll need to buy sensors specifically designed for your opener’s brand, like LiftMaster or Chamberlain.
When replacing, match the sensor model number exactly to make certain compatibility.
Using an incompatible sensor can cause alignment issues or sensor failures.
Always consult your opener’s manual before purchasing replacements to avoid functionality problems.
How Often Should Garage Door Sensors Be Professionally Serviced?
You should have your garage door sensors professionally serviced every 1 to 2 years. Regular inspections guarantee sensors are clean, aligned, and functioning correctly, preventing malfunctions.
If you notice blinking lights, inconsistent door operation, or sensor damage, schedule service immediately. Frequent maintenance extends sensor life and avoids costly repairs.
Always follow manufacturer recommendations and consult a professional if troubleshooting doesn’t resolve issues.
Back on Track: Restoring Safety and Smooth Garage Door Performance
Now that you’ve safely shut off power, scrutinized sensor surfaces, and secured proper sensor alignment, you’re set to swiftly restore power and reset your sensors.
Staying sharp with these steps should solve most sensor snags. Should stubborn sensor signals still stop your system, don’t hesitate to seek skilled support.
Remember, regular sensor scrutiny safeguards smooth garage door operation and saves you from serious sensor setbacks.