To change the battery in your Honeywell thermostat, first turn off your HVAC system.
Then gently remove the thermostat from its wall plate to access the battery compartment, usually on the back.
Remove old AA or AAA alkaline batteries one at a time, observing correct polarity.
Insert fresh batteries aligned with positive and negative markings, then securely snap the thermostat back onto the wall plate.
Restore power and verify the system functions properly.
For detailed steps and troubleshooting, you’ll find more essential information ahead.
Key Takeaways
- Turn off your HVAC system before removing the Honeywell thermostat from its wall plate to prevent electrical issues.
- Access the battery compartment on the back or side of the thermostat, depending on the model, following orientation markings.
- Remove old batteries one at a time, noting polarity, and avoid mixing old and new batteries or different brands.
- Insert fresh AA alkaline batteries (or AAA for sensors) aligning positive and negative ends exactly as indicated in the compartment.
- Reinstall the thermostat onto the wall plate securely, restore HVAC power, and verify the thermostat display and system operation.
Tools and Batteries Needed for Honeywell Thermostat Replacement
To get started with replacing your Honeywell thermostat batteries, you’ll need a few essential tools and the correct batteries.
Most Honeywell models, including the 5000, 6000, 8000, and VisionPRO series, require AA alkaline batteries.
Sensors typically use AAA alkaline batteries.
Avoid rechargeable batteries, as their voltage can cause inconsistent thermostat performance.
Have a soft cloth or dry towel handy to handle the unit gently and prevent damage or smudges.
Make certain you use fresh batteries to maintain proper function and avoid premature low battery warnings.
Preparing these tools and batteries in advance streamlines the replacement process and reduces downtime.
Accurate battery type and handling are critical for maintaining your thermostat’s reliability and ensuring continued efficient HVAC operation.
Keep in mind that low thermostat batteries can trigger the compressor protection delay and cause the thermostat to flash Cool.
How to Remove Your Honeywell Thermostat Safely?
Once you’ve gathered the right batteries and tools, you’ll need to safely remove your Honeywell thermostat before replacing the batteries.
First, turn off your HVAC system to prevent electrical issues.
Begin by turning off your HVAC system to ensure safety and avoid electrical problems.
Next, grasp the bottom edge of the thermostat firmly and gently pull it away from the wall plate.
Avoid pulling abruptly to prevent damaging wiring or the mounting plate.
For FocusPRO models, locate and press the tab at the upper right corner to release the battery compartment.
Once released, carefully lift the thermostat off its mount.
Handle the unit with a soft cloth or dry towel to avoid static damage.
Keep the thermostat level while removing to prevent dislodging internal components.
With the thermostat removed, you’re ready to access the battery compartment for replacement.
Be sure to use non-rechargeable batteries to ensure stable and reliable thermostat operation.
Where to Find Battery Compartments on Honeywell Thermostat Models?
Although battery compartments vary across Honeywell thermostat models, you’ll typically find them on the back of the unit or beneath a dedicated cover.
For example, in the Honeywell 5000, 6000, and 8000 Series, the battery compartment is accessible by removing the thermostat from its wall plate and locating the slot on the rear.
VisionPRO models also house batteries behind a rear panel.
FocusPRO models feature a battery compartment accessible by pressing a tab at the upper right corner, revealing a dedicated battery slot without full removal.
Always look for markings indicating battery orientation near the compartment.
Before attempting battery replacement, make certain you identify this compartment clearly to avoid damaging internal components or wiring during access.
Use a soft cloth to handle the thermostat if needed.
Remember, using high-quality batteries helps ensure reliable operation and reduces the risk of leakage or premature failure.
How to Remove Old Batteries Without Damaging Your Thermostat?
Before you dive into removing those old batteries, it’s a good idea to turn off your HVAC system first. This little step helps prevent any electrical damage that might occur.
Trust me, it’s worth it!
When you’re ready to lift the thermostat or open any compartments, be gentle. We don’t want to crack or break any components, right?
Just take your time and handle everything with care.
Oh, and don’t forget to pay attention to the battery orientation before you take them out. This way, when you go to put in the new batteries, you’ll know exactly how they should be positioned.
It’ll save you a lot of hassle later on!
For many thermostats, using alkaline batteries is recommended because they offer reliable voltage and longer lifespan compared to other types.
Power Off Before Removal
To prevent electrical issues and protect your Honeywell thermostat, you should turn off your HVAC system prior to removing the old batteries. This step cuts power to the thermostat, eliminating the risk of short circuits or damage to internal components during battery removal.
Locate your HVAC system’s power switch or breaker and switch it off. Confirm the thermostat display goes blank, indicating power is fully disconnected. Only then proceed to detach the thermostat from its wall plate to access the battery compartment.
Avoid removing batteries while the thermostat remains powered to prevent data corruption or hardware malfunction. Once powered down, you can safely remove old batteries one at a time, noting their orientation.
After replacement, restore power and verify functionality before reassembling the unit. Ensuring the correct identification and connection of load wires in your thermostat wiring is essential to maintain electrical safety and proper device operation.
Gentle Detachment Techniques
Once you’ve powered off your HVAC system and prepared to remove the thermostat from its wall plate, handle the device carefully to avoid damage.
Follow these steps to detach the batteries gently:
- Support the thermostat firmly with one hand while you pull the bottom edge away from the wall plate with the other. Apply steady but gentle pressure to release the clips without bending them.
- For FocusPRO models, press the battery compartment tab at the upper right corner to open it without forcing or twisting.
- Remove old batteries one at a time by sliding them out carefully. Avoid using sharp tools that could puncture the casing or damage contacts.
These techniques preserve the housing and circuitry, ensuring your thermostat remains fully functional during battery replacement. Proper maintenance and careful handling are essential to prevent damage and extend the lifespan of your device’s internal components.
Battery Orientation Awareness
Pay close attention when you pull out the old batteries to avoid reversing their polarity or damaging the contacts.
Remove batteries one at a time, noting the positive (+) and negative (–) ends as marked in the compartment.
Use a soft cloth or dry towel to grip batteries gently, preventing contact damage.
Avoid twisting or forcing batteries out, as this risks bending the metal terminals.
When inserting new batteries, align the positive and negative ends exactly as indicated to maintain proper circuit function.
Mismatched polarity can cause malfunction or permanent damage.
After replacement, inspect the contacts for corrosion or debris and clean if necessary before closing the compartment.
Following these steps guarantees reliable thermostat operation and extends component longevity.
For added protection, consider a cover or guard to prevent accidental damage, similar to how peephole covers protect lens integrity and function.
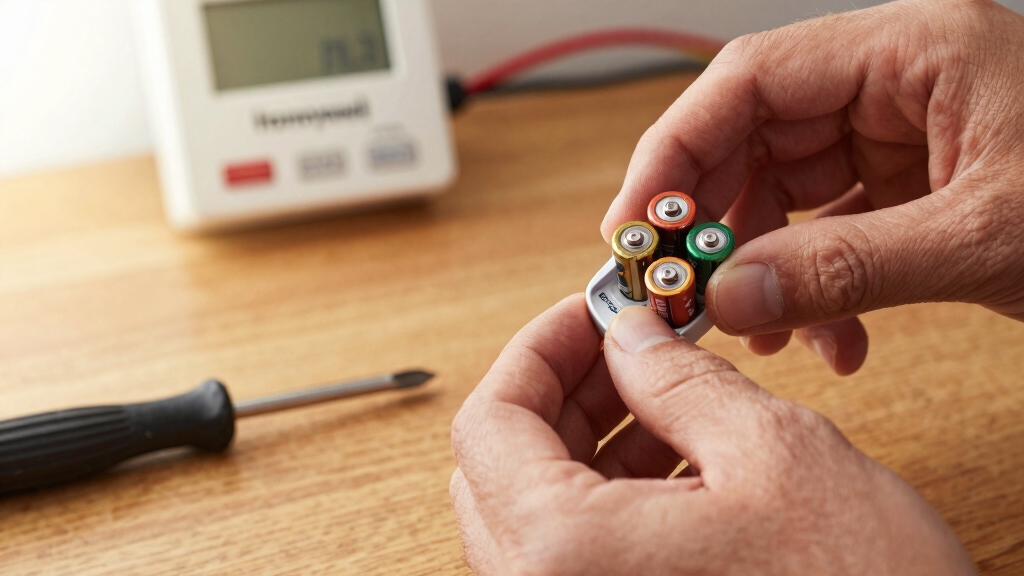
How to Insert New Batteries Correctly in a Honeywell Thermostat?
Locate the battery compartment on the back of your Honeywell thermostat and carefully observe the positive (+) and negative (-) markings. Proper battery insertion guarantees reliable thermostat operation and prevents damage.
Find the battery compartment on your Honeywell thermostat’s back and follow the positive and negative markings carefully.
Follow these steps:
- Insert each new AA alkaline battery one at a time, aligning the positive (+) end with the corresponding marking in the compartment and the negative (-) end opposite.
- Avoid mixing old and new batteries or different brands to maintain consistent voltage and prevent malfunctions.
- After inserting all batteries, gently press them into place to guarantee secure contact with the terminals.
Always dispose of used batteries according to local regulations. Correct insertion prevents reset issues and maintains accurate temperature control. Regular maintenance, including battery replacement, helps ensure your thermostat functions properly and avoids potential issues with HVAC system controls.
How to Reinstall Your Thermostat and Test Its Functionality?
So, once you’ve got your thermostat ready, it’s time to align those pins with the wall plate connectors. Just make sure everything lines up nicely, then give it a firm push to snap the unit back into place.
Next up, go ahead and turn your HVAC system on. This will restore power to your thermostat, and you should see the display light up. That’s always a good sign!
Finally, take a moment to adjust the temperature settings. This will help you check if the system responds like it should. If everything’s working smoothly, you’re all set!
For optimal energy efficiency and comfort, consider setting your thermostat around 78°F during summer as recommended by energy experts.
Align And Snap
Carefully position the thermostat so its pins match the connectors on the wall plate, then firmly snap the unit into place. Make certain a secure connection without forcing the unit to avoid damaging pins or connectors.
Follow these steps:
- Align the thermostat’s pins directly over the wall plate connectors, verifying orientation before pressing.
- Apply even pressure on the thermostat’s edges until you hear a click, confirming it’s locked.
- Visually inspect the edges to make certain the thermostat sits flush against the wall plate with no gaps.
This precise alignment guarantees reliable electrical contact, essential for accurate communication between the thermostat and HVAC system. Always ensure proper alignment and secure connection to avoid damaged terminals that could impair device functionality.
Once snapped in, the unit is ready for power restoration and functional testing.
Power On And Test
Once the thermostat is securely snapped into place, you’ll want to restore power to your HVAC system to begin testing its functionality.
Turn the system back on at the breaker or control switch.
Check the thermostat display to ensure it powers up correctly and shows the appropriate settings.
Adjust the temperature setting to trigger your heating or cooling system; listen for system activation or feel airflow changes at vents.
Confirm the thermostat responds promptly without error messages or resets.
If your model reset during battery replacement, re-enter your preferred settings.
Should the thermostat fail to power on or respond, verify battery installation and contact support if needed.
Completing these steps assures your Honeywell thermostat operates reliably with fresh batteries installed.
Signs Your Honeywell Thermostat Needs New Batteries
You’ll often see a low battery warning on your Honeywell thermostat about two months before the batteries are fully depleted. This early alert helps prevent system interruptions.
You should replace the batteries when you notice these signs:
- The thermostat display shows a clear “Low Battery” message or icon.
- The device becomes unresponsive or frequently resets, indicating insufficient power.
- Sensor warnings appear; for example, the indoor sensor flashes red 2-3 weeks before battery failure.
Prompt replacement guarantees your thermostat maintains accurate temperature control and reliable communication with your HVAC system.
Ignoring these signs can cause unexpected shutdowns or incorrect readings, disrupting your home’s comfort.
Always use fresh AA alkaline batteries unless your model specifies otherwise.
How to Troubleshoot Battery-Related Issues After Replacement?
Replacing your Honeywell thermostat batteries should restore proper function, but if issues persist, troubleshooting is necessary.
First, confirm the batteries have proper polarity, matching the positive (+) and negative (-) terminals as indicated.
Check that the batteries are fresh alkaline types; avoid rechargeables due to inconsistent voltage.
Remove and reseat the batteries to confirm firm contact with terminals.
Inspect the battery compartment for corrosion or debris, cleaning with a dry cloth if needed.
Verify the thermostat is correctly reinstalled on the wall plate and confirm pins align with connectors.
After reinstalling, power on the HVAC system and observe if the display initializes without error.
If problems continue, reset the thermostat settings, as some models require manual restoration post battery change.
This systematic approach addresses common battery-related issues effectively.
How to Dispose of Old Thermostat Batteries?
When you take out the old batteries from your Honeywell thermostat, make sure to dispose of them properly to prevent environmental harm.
Follow these steps to handle battery disposal safely and legally:
- Identify Battery Type: Confirm if the batteries are alkaline (AA or AAA) or rechargeable. Honeywell units typically use alkaline batteries, which are less hazardous but still require proper disposal.
- Locate Disposal Facilities: Use local resources such as household hazardous waste (HHW) collection sites, battery recycling centers, or retail stores that accept used batteries.
- Prepare Batteries for Disposal: Tape the terminals of each battery to prevent short-circuiting.
Store them in a non-metal container before transport.
Frequently Asked Questions
Can I Use Rechargeable Batteries in My Honeywell Thermostat?
You shouldn’t use rechargeable batteries in your Honeywell thermostat because their voltage output is lower and inconsistent compared to alkaline batteries.
This can cause the thermostat to malfunction or display low battery warnings prematurely.
Stick to fresh AA alkaline batteries for peak performance.
Using the correct batteries guarantees your thermostat operates reliably and avoids unexpected resets or sensor errors.
Always follow the manufacturer’s recommendations for battery type and replacement intervals.
How Often Should I Replace Thermostat Batteries Under Normal Use?
You should replace your thermostat batteries approximately every 12 months under normal use.
Monitor for low battery warnings, which typically appear two months before depletion.
If your thermostat becomes unresponsive or resets frequently, replace batteries immediately.
Always use fresh AA alkaline batteries, avoid rechargeables, and dispose of old ones properly.
Regular replacement guarantees reliable system performance and prevents unexpected interruptions in your HVAC operation.
Will Changing Batteries Erase My Thermostat’s Programming?
Changing the batteries in your Honeywell thermostat may cause the device to reset, erasing programmed settings.
To avoid this, turn off your HVAC system first and replace batteries quickly, one at a time, following polarity markings.
Some models have backup power to preserve programming, but it’s best to prepare for possible resets.
After replacement, verify settings and restore them if necessary to make certain your thermostat operates as intended.
Are There Specific Battery Brands Recommended for Honeywell Thermostats?
You don’t need specific battery brands for Honeywell thermostats, but you should use high-quality AA alkaline batteries to guarantee consistent voltage and performance.
Avoid rechargeable batteries since their voltage varies and can cause malfunctions. Brands like Duracell, Energizer, or Panasonic are reliable choices.
Always use fresh batteries and replace them promptly when low battery warnings appear to maintain proper thermostat operation and avoid unexpected resets or sensor errors.
Can Battery Issues Cause Heating or Cooling System Malfunctions?
Think of your thermostat’s battery as the heart pumping life into your heating or cooling system. Yes, battery issues can cause malfunctions. Weak or dead batteries may lead to unresponsive controls, system resets, or failure to communicate with HVAC components.
You’ll notice warnings up to two months before depletion. Replacing batteries promptly guarantees smooth operation and prevents interruptions. Always check battery orientation and use fresh alkaline batteries to keep your system running efficiently.
Power Restored: Your Honeywell Thermostat Is Ready to Go
Now that you’ve gathered your tools, removed the old batteries, inserted new ones correctly, and reinstalled your Honeywell thermostat, you’re ready to test its functionality.
Remember to watch for signs of low battery, troubleshoot any issues promptly, and dispose of old batteries responsibly.
By following these steps carefully, you guarantee your thermostat runs smoothly, maintains accurate temperature control, and extends its lifespan efficiently and safely every time.