To disconnect your smoke alarm, first turn off power at the breaker for hardwired units. Then, remove the battery or backup battery to cut power completely.
Twist the alarm counterclockwise to release it from the mounting bracket. Unplug the wiring harness by squeezing locking arms or pressing side tabs.
Don’t forget to disable tamper-resistant features to avoid damage. Finally, use the test button to confirm it’s fully powered off. Keep exploring for detailed steps and safety tips.
Key Takeaways
- Turn off power at the main breaker panel to cut electricity to hardwired smoke alarms before disconnecting them.
- Remove the battery backup from the alarm to stop power flow and prevent unexpected chirping.
- Twist the smoke alarm counterclockwise to release it from the mounting bracket for easy removal.
- Disconnect the wiring harness by squeezing locking arms or pressing side tabs to unplug the connector safely.
- Disable any tamper-resist features by pressing tabs or removing pins before fully removing the alarm.
How to Temporarily Silence Your Smoke Alarm?
You can often silence your smoke alarm temporarily by pressing and holding the hush or silence button for about two seconds.
Press and hold the hush or silence button for two seconds to temporarily silence your smoke alarm.
This action pauses the alarm, usually for 5 to 10 minutes, which is helpful during cooking or when false alarms occur.
The alarm automatically resets after about 8 minutes if the smoke clears. If the alarm continues, press the button repeatedly until the air quality improves.
Keep in mind, this method doesn’t fully deactivate the smoke alarm; it only suspends the sound temporarily.
Always monitor the situation closely and make certain the alarm resumes normal function after the hush period ends.
Using this feature correctly helps avoid unnecessary panic without compromising your safety.
Pressing the Test/Silence button will cause the LED to flash every 10 seconds while silence mode is active, indicating the alarm is temporarily quieted.
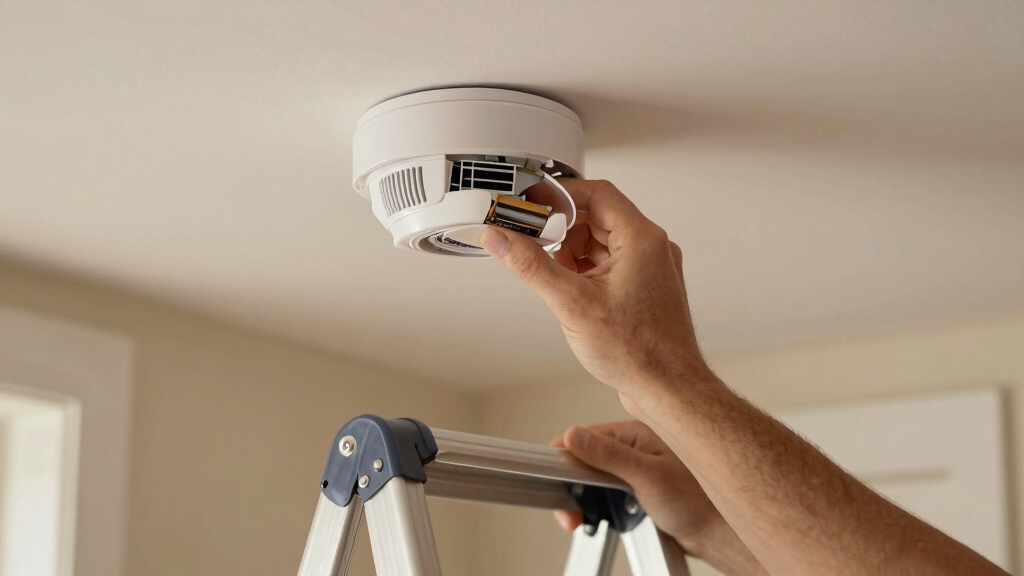
Removing the Battery From a Battery-Powered Smoke Alarm
To remove the battery from a battery-powered smoke alarm, start by finding the cover. Just give it a twist counterclockwise, and you’ll be able to access the battery compartment.
Once you’re in, carefully pull out the battery. It’s a good idea to pay attention to how it’s positioned, so you can replace it correctly later.
And remember, always use the recommended battery type when you’re replacing it. It’s important to do this promptly to keep your alarm working reliably.
Also, be sure to dispose of old batteries properly at designated recycling facilities to protect the environment and ensure safety.
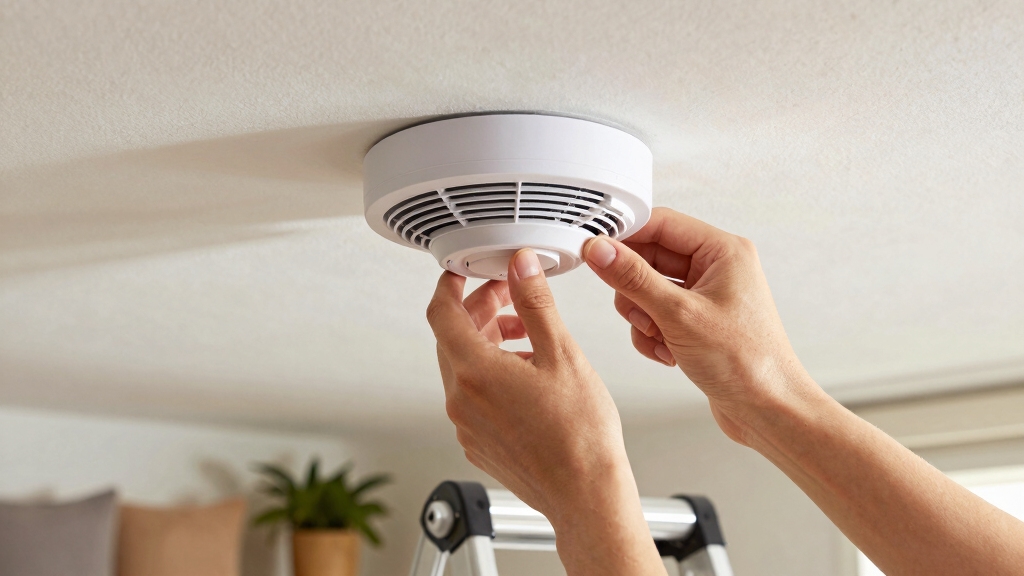
Locating The Battery
In most battery-powered smoke alarms, locating the battery requires removing the alarm cover by twisting it counterclockwise following the OFF arrow.
Once you twist the cover off, you’ll expose the battery compartment, which is typically easy to identify. The battery is usually secured in a terminal or slot, designed for quick removal and replacement.
Knowing exactly where to find the battery will streamline maintenance or disconnection. Keep these points in mind when locating the battery:
- The cover often has a clear OFF arrow indicating the twist direction.
- Battery compartments may house standard 9-volt or AA batteries.
- Some models have a battery pull-tab or compartment door inside the cover.
Always check the battery at least once a month during cover use to ensure the battery backup remains functional.
Removing The Battery
Start by twisting the smoke alarm cover counterclockwise following the OFF arrow to access the battery compartment.
Once open, carefully remove the battery by pulling it out from its terminal. This action immediately disconnects power and stops the alarm.
Handle the battery with care to avoid damage or corrosion. After removal, leave the cover off or rotate the alarm off its trim ring if needed for safety.
For many models, pressing down the red battery reminder finger inside the compartment before removing the battery helps ensure proper disconnection and later reconnection.
| Step | Action |
|---|---|
| Twist Cover | Turn counterclockwise to open |
| Remove Battery | Pull battery from terminal |
| Secure Alarm | Rotate off trim ring if required |
Always confirm the alarm is silent before proceeding with any maintenance or replacement.
Battery Replacement Tips
Carefully remove the old battery from your smoke alarm by twisting the cover counterclockwise and pulling the battery from its terminal.
Always replace the battery with one that matches the manufacturer’s specifications to ensure peak performance.
Avoid mixing old and new batteries, as this can cause malfunction or premature failure.
When inserting the new battery, verify correct polarity alignment to prevent damage.
Keep these tips in mind during replacement:
Use fresh batteries with the correct voltage and type recommended by the manufacturer.
Dispose of old batteries properly to avoid environmental harm.
Test the alarm by pressing the test button after replacement to confirm it’s working correctly.
Following these steps guarantees reliable smoke alarm operation and safety in your home.
For longer-lasting power, consider using sealed 10-year lithium batteries when compatible with your smoke alarm model.
Safely Turning Off Power to Hardwired Smoke Alarms
Alright, let’s walk through safely turning off the power to your hardwired smoke alarms. First things first, head over to your main breaker panel. You’ll need to find the specific circuit that powers your smoke alarms.
Once you’ve located it, go ahead and flip that breaker off. This will cut the electricity safely, which is super important.
After that, it’s a good idea to double-check that there’s no power. You can do this by testing the alarm or any related fixtures. Just to make sure you’re all good and safe before you move on!
Before unmounting the alarm, remember to remove the battery and press and hold the test button to discharge any residual power and silence the unit.
Identify Smoke Alarm Circuit
When working with hardwired smoke alarms, you’ll need to locate the main breaker panel and identify the specific circuit that powers the alarms to guarantee safety. This step ensures you can safely cut power before any maintenance or disconnection.
Start by checking the labels on the breaker panel; many panels list which circuits control smoke alarms. If unclear, test circuits one at a time by turning them off and verifying if the alarms lose power.
Remember, some smoke alarms share circuits with other devices like lights or outlets.
Key steps to identify the smoke alarm circuit:
- Examine breaker panel labels carefully for smoke alarm indication.
- Turn off breakers one at a time while monitoring alarm status.
- Note any shared circuits with lighting or outlets for all-inclusive power cutoff.
Always ensure that backup batteries are maintained and tested even after disconnecting power to avoid lapses in continuous protection.
Flip Breaker Safely Off
Before handling any hardwired smoke alarm, you’ll want to flip the correct breaker off to cut power safely.
Locate your main breaker panel and identify the breaker controlling the smoke alarm circuit. Flip it to the OFF position to stop electricity flow.
If the circuit powers other devices, turn those off too to prevent accidental shocks. This step protects you from electrical hazards while working on the alarm.
Because hardwired systems use continuous 240-volt main power with a 9-volt battery backup, ensuring the main power is off is crucial for safe maintenance of the dual-source design.
| Step | Action | Purpose |
|---|---|---|
| Locate Breaker Panel | Find main electrical panel | Access circuit breakers |
| Identify Circuit | Label or test smoke alarm line | Verify correct breaker |
| Flip Breaker Off | Switch breaker to OFF position | Cut power safely |
Always confirm the breaker controls the alarm before proceeding.
Confirm Power Disconnection
Although you’ve flipped the breaker off, you need to confirm that power is fully disconnected before handling your hardwired smoke alarm. This step guarantees your safety and prevents electrical shock.
Start by testing the alarm’s power status: press the test button and watch for any response. If the alarm sounds or lights up, power may still be active or a battery backup is engaged.
Next, check if other devices on the same circuit are off, confirming the breaker controls the correct line. Finally, use a non-contact voltage tester on the smoke alarm’s wiring to verify no electricity is present.
- Test the alarm’s response after breaker shutdown
- Confirm all devices on the circuit are off
- Use a voltage tester to verify zero current
Only proceed once power is fully confirmed disconnected. Note that many hardwired smoke alarms include a backup battery that may power the unit even when mains power is off.
Disconnecting the Wiring Harness From Hardwired Smoke Alarms
To disconnect the wiring harness from a hardwired smoke alarm, start by twisting the alarm counterclockwise to release it from the mounting bracket.
Once the alarm is free, locate the quick connector attaching the wiring harness to the alarm.
Squeeze the locking arms on the connector firmly and pull it straight away from the alarm to unplug it.
Be careful not to force or damage the wires.
If the connector uses tabs on the sides, press them simultaneously to release the plug.
It’s important to note the wire positions or take a photo before disconnecting to ensure correct reconnection later.
After unplugging, the smoke alarm is fully disconnected from the hardwired power source, allowing safe removal or replacement.
Before starting, make sure to shut off power at the circuit breaker to avoid electrical hazards during disconnection of the hard-wired alarm.
How to Turn Off Tamper-Resist Features Before Removing Alarms?
When you need to remove a smoke alarm with tamper-resist features, you’ll have to disable these safeguards first to avoid damage.
Removing a smoke alarm with tamper-resist features requires disabling safeguards first to prevent damage.
Tamper-resist mechanisms prevent unauthorized removal but can complicate legitimate maintenance. To turn them off properly, follow these key steps:
Pull the tamper-resist pin using long nose pliers if your model has one.
Press down on the tamper-resist tab and rotate the alarm toward the OFF arrow to disengage the lock.
Refer to the user manual for model-specific instructions, as mechanisms may vary.
Disabling tamper-resist features before removal guarantees you don’t break internal components or mounting brackets.
Always handle the alarm gently during this process to maintain its integrity for future use or reinstallation.
Safety Tips for Working on Ceiling-Mounted Smoke Alarms
Since ceiling-mounted smoke alarms are often installed in hard-to-reach areas, you need to prioritize safety before starting any maintenance.
Always use a sturdy ladder or step stool to access the alarm securely. Avoid standing on unstable furniture or makeshift platforms.
Make sure the area is well-lit to clearly see wiring and components. Before touching the alarm, cut power at the breaker panel if it’s hardwired and remove batteries if applicable.
Keep a flashlight and tools within easy reach to minimize unnecessary movement. Avoid rushing and work methodically to prevent accidental falls or damage.
If you feel unsure about handling electrical components or positioning yourself safely, consult a professional. Your safety is paramount when working on ceiling-mounted smoke alarms.
How to Use the Test Button to Check Smoke Alarm Power and Functionality?
To ensure your smoke alarm is in good working order, you can use the test button. Just press and hold that button for about 5 seconds. If you hear a loud chirp or alarm sound, that’s a good sign—it means your device is active and functioning properly.
But if nothing happens when you press the button, don’t panic! First, check the power source or battery. It could be as simple as needing a replacement. Once you’ve done that, try testing it again. Safety first!
Testing Power Connection
Regularly testing your smoke alarm’s power connection guarantees it functions properly when you need it most. To check, simply press and hold the test button on the alarm. This activates the alarm’s internal circuitry, confirming the power supply is intact and the device is operational.
When testing your smoke alarm’s power connection, keep these points in mind:
- Hold the test button for at least 5 seconds to guarantee a full diagnostic check.
- Listen for a loud, continuous beep indicating proper power and functionality.
- If the alarm fails to sound, inspect the battery or hardwired connection immediately.
Verifying Alarm Response
Frequently testing your smoke alarm’s response guarantees it will alert you effectively in an emergency. To verify its functionality, press and hold the test button for about five seconds.
The alarm should emit a loud, continuous sound, confirming both power and sensor operation. If you don’t hear the alarm, check the battery or power source immediately.
Remember, a brief chirp indicates low battery or malfunction, not a full test. Avoid using actual smoke to test, as this can damage the unit.
Instead, rely on the test button for a safe, reliable check. Regular testing makes certain your smoke alarm remains responsive, giving you peace of mind.
If the alarm fails to respond correctly, replace batteries or consult a professional to maintain safety standards.
When and How to Replace Smoke Alarm Batteries?
You should check your smoke alarm batteries at least twice a year to make sure they’re working properly. Replace batteries immediately if the alarm chirps or fails a test.
Check your smoke alarm batteries biannually and replace them immediately if the alarm chirps or fails testing.
Using fresh, high-quality batteries guarantees reliable operation and safety. When replacing batteries, follow these steps:
Twist off the alarm cover counterclockwise to access the battery compartment. Remove the old batteries, noting their orientation, and insert new ones matching the specified type.
Close the cover securely and press the test button for 5 seconds to confirm power and function. Regular replacement prevents false alarms and power failures.
Avoid mixing old and new batteries or different brands, as this can cause malfunction. Keeping your smoke alarm powered is critical to maintaining your home’s fire safety.
Fixing a Smoke Alarm That Keeps Chirping After Power Off
Often, a smoke alarm continues chirping even after you’ve turned off its power, signaling an underlying issue that needs addressing.
First, check if the alarm has a battery backup; removing the main power won’t stop the chirp if the battery remains installed.
Open the alarm housing by twisting it counterclockwise, then remove the battery to fully cut power.
If it still chirps, press the hush or silence button repeatedly to reset it.
Make sure to inspect and clean dust or debris inside the unit, as buildup can trigger false alerts.
Finally, after troubleshooting, reinstall the battery and restore power, then test the alarm for proper function.
Persistent chirping despite these steps may indicate a faulty unit needing replacement.
When to Call a Professional for Smoke Alarm Help?
Although many smoke alarm issues can be resolved with basic troubleshooting, certain situations demand professional expertise to guarantee safety and proper function. You should call a professional when you encounter complex electrical wiring, persistent alarms despite battery replacement, or damage from water or fire.
Some smoke alarm problems require professional help to ensure safety and proper operation.
Professionals ensure the device is safely disconnected, repaired, or replaced without risking electrical hazards. Consider seeking expert help if you face:
- Unfamiliar or hardwired smoke alarm systems that require circuit breaker management
- Recurring false alarms after standard fixes
- Physical damage affecting internal components or wiring
Engaging a professional protects your home and ensures your smoke alarms operate reliably. This maintains your safety without guesswork. Don’t hesitate to get expert assistance when in doubt.
Frequently Asked Questions
Can I Disconnect Multiple Smoke Alarms at the Same Time?
You can disconnect multiple smoke alarms simultaneously if they’re hardwired on the same circuit by flipping off the main breaker controlling them.
Just be cautious; this cuts power to all connected devices on that circuit, including lights or outlets. For battery-powered alarms, you’ll need to remove batteries individually.
Always make sure safety first, use a sturdy ladder, and restore power quickly after maintenance. If unsure, consult a professional to avoid wiring mistakes.
How Do I Dispose of an Old Smoke Alarm Safely?
To dispose of an old smoke alarm safely, first remove the battery or disconnect power to prevent accidental alarms.
Check local regulations; some areas require you to recycle smoke alarms due to hazardous materials like radioactive elements in ionization models.
Take it to a designated recycling center or hazardous waste facility.
Never throw it in regular trash to avoid environmental harm.
Always handle with care and wear gloves if the unit is damaged.
Are There Legal Requirements for Smoke Alarm Disconnection?
You wouldn’t just pull the fire alarm in a crowded theater without cause, right?
Similarly, laws often require you to keep smoke alarms active for safety. Most regions demand functioning alarms and only allow disconnection during maintenance or emergencies.
Disconnecting without a valid reason can violate local codes and put you at risk legally and physically.
Always check your local fire safety regulations before unplugging or removing alarms to stay compliant and safe.
What Should I Do if My Smoke Alarm Is Hardwired With Multiple Units?
If your hardwired smoke alarms are interconnected, start by turning off the main breaker controlling their circuit to cut power safely.
Remember, battery backups need battery removal too.
Disconnect each alarm by twisting it off its mounting bracket, then carefully unplug the wire harness by squeezing the locking arms.
Take photos or note wire positions for reinstallation.
Always handle wiring cautiously, and if unsure, consult a professional electrician to avoid hazards.
Can Pets Trigger Smoke Alarms and Cause False Alarms?
Pets don’t produce smoke, yet they can still trigger your smoke alarm by accidentally disturbing it or stirring up dust and dander.
Their movement near sensors might cause false alarms, especially if your detector is overly sensitive.
To prevent this, place alarms away from pet activity zones and clean detectors regularly.
Understanding this helps you avoid unnecessary panic and maintain reliable fire safety without blaming your furry friends.
Powering Down Safely: Your Final Guide to Smoke Alarm Control
Disconnecting your smoke alarm isn’t as intimidating as defusing a ticking time bomb. By safely removing batteries, turning off power, or disconnecting wiring harnesses, you take control without sparking danger.
Remember to test functionality regularly and replace batteries like clockwork. If your alarm keeps chirping or you’re unsure, don’t hesitate to call a professional. Just like a skilled conductor leading an orchestra, you guarantee your home’s safety runs smoothly and silently.