To replace the battery in your First Alert P1210, start by removing the cover screws. Hidden screws might be under a sticker, so cut carefully with a razor blade.
Unplug the old non-rechargeable CR17335 lithium battery connector without pulling wires. Slide out the old battery, then firmly connect and secure the new one in place.
Reassemble the cover, tighten screws, and test the unit by holding the test button for 5 seconds. Detailed steps will help you complete the job smoothly.
Key Takeaways
- Use a Phillips screwdriver and razor blade to remove visible and hidden screws, carefully lifting the cover without damaging the casing or sticker.
- Unplug the CR17335 battery connector by pulling straight out, gently release plastic tabs, and slide the old battery out without bending wires.
- Insert the new CR17335 battery, firmly connect the pre-attached connector until it clicks, and secure the battery and circuit board with tabs.
- Replace the cover, tighten all screws, flip the deactivate switch to active, and immediately perform a 5-second self-test by holding the test button.
- Confirm a loud, continuous beep to verify proper installation; if alarm fails, recheck connections and repeat testing before disposal of the old battery.
How To Identify When Your First Alert P1210 Battery Is Low?
You’ll often notice a consistent chirping sound when your First Alert P1210 battery is running low. It’s designed with a sealed 10-year lithium battery.
A consistent chirping signals your First Alert P1210’s sealed 10-year lithium battery is running low.
This chirp occurs at regular intervals and signals that the battery’s voltage is dropping below the necessary level to maintain reliable operation. You might also observe the unit’s LED indicator flashing more frequently during this time.
Since the P1210 uses a non-rechargeable CR17335 lithium battery, this alert is vital to avoid failure. Even if your detector hasn’t reached the 10-year mark, don’t ignore the chirping.
It’s a prompt to prepare for battery replacement or unit servicing. Recognizing these sounds and signals guarantees your smoke detector remains fully functional and keeps you safe.
Sealed 10-year battery alarms like the P1210 provide maintenance-free operation without the need for battery replacement during their lifespan.
What Tools You Need for First Alert P1210 Battery Replacement?
Noticing your First Alert P1210’s low battery chirp means it’s time to prepare for replacement. To do this efficiently, gather the right tools before starting.
You’ll need a Phillips screwdriver for screws, a razor blade to cut the sticker hiding some screws, and optionally, needle-nose pliers for handling tabs or wires carefully. Also, have your replacement 3V/3.6V CR17335 lithium battery ready. A multimeter can help verify the battery’s voltage, though it’s not mandatory.
| Tool | Purpose | Notes |
|---|---|---|
| Phillips Screwdriver | Remove visible screws | Essential for disassembly |
| Razor Blade | Cut sticker covering screws | Use carefully to avoid damage |
| Needle-nose Pliers | Handle tabs and wires | Optional, for precision |
Having these tools handy guarantees a smooth battery replacement. Remember to maintain regular testing and maintenance to ensure reliable operation of your smoke detector.
How To Choose the Right Replacement Battery for Your P1210?
Selecting the right replacement battery for your First Alert P1210 is crucial to guarantee reliable smoke detection and uninterrupted service.
Your P1210 specifically requires a sealed 10-year lithium battery, typically a 3V or 3.6V CR17335 non-rechargeable lithium type.
Avoid rechargeable or lower voltage batteries, as they may cause malfunction or trigger false alarms.
Choose a genuine replacement battery with a pre-attached connector to make installation easy and ensure a proper fit.
While these batteries are designed for a decade, occasional early failure means you should verify the battery’s voltage with a multimeter if unsure.
Investing in the correct battery not only preserves your smoke detector’s functionality but also helps maintain your home’s safety without unnecessary replacements or repairs.
For optimal performance, always remove the battery before resetting your alarm to ensure total power isolation.
How To Access Hidden Screws on the First Alert P1210?
After choosing the right replacement battery for your First Alert P1210, the next step is gaining access to the unit’s hidden screws.
First, inspect the detector for a visible screw securing the cover. Next, look for a sticker on the back or side concealing additional screws.
Carefully use a razor blade to cut along the edges of this sticker without damaging it, revealing the hidden screws underneath.
Once exposed, use a Phillips screwdriver to remove both the visible and hidden screws. Keep these screws safely aside to avoid losing them.
With all screws removed, you’ll be able to lift the cover and access the internal components for battery replacement.
Take your time during this step to avoid any damage to the casing or sticker.
Remember to vacuum vents regularly to remove dust and debris that can impair sensor function during maintenance.
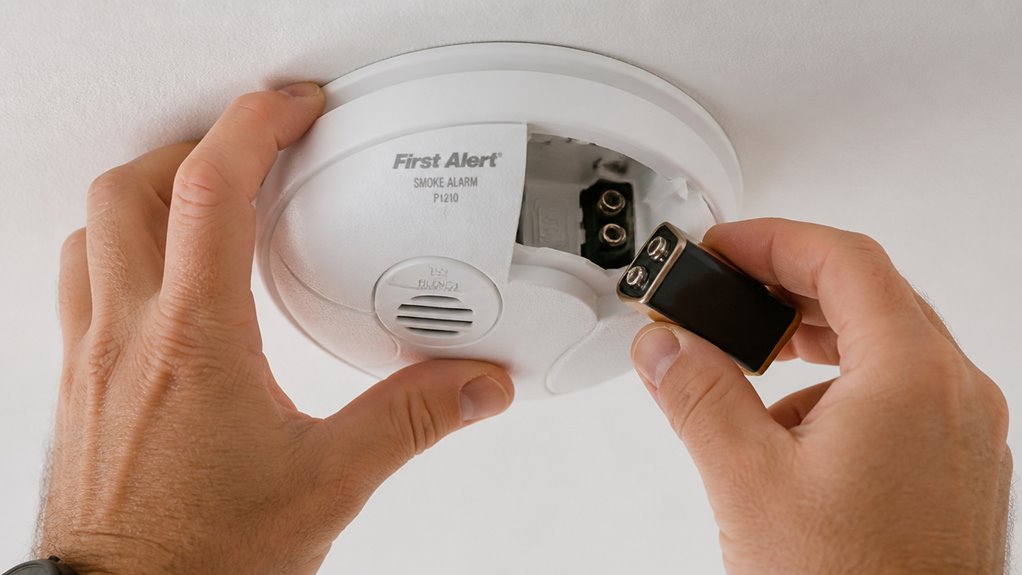
How to Remove the Old CR17335 Battery From Your P1210?
Start by carefully unplugging the battery connector from the circuit board inside your P1210. Gently grasp the connector, avoiding pulling on wires, and pull it straight out to prevent damage.
Next, locate the plastic tabs securing the battery and circuit board assembly. Use your fingers or a small tool to lift these tabs, releasing the battery’s hold.
Find the plastic tabs holding the battery assembly and gently lift them to free the battery.
Once loose, slide the old CR17335 battery out of its compartment slowly, ensuring you don’t bend any contacts or wires. If the battery feels stuck, double-check that all tabs are fully disengaged.
Avoid forcing the battery out to prevent damage. After removal, set the old battery aside for proper disposal. Now your P1210 is ready for the new battery installation.
Remember to remove any backup battery as needed to fully power down the alarm during replacement to avoid accidental activation of the battery backup.
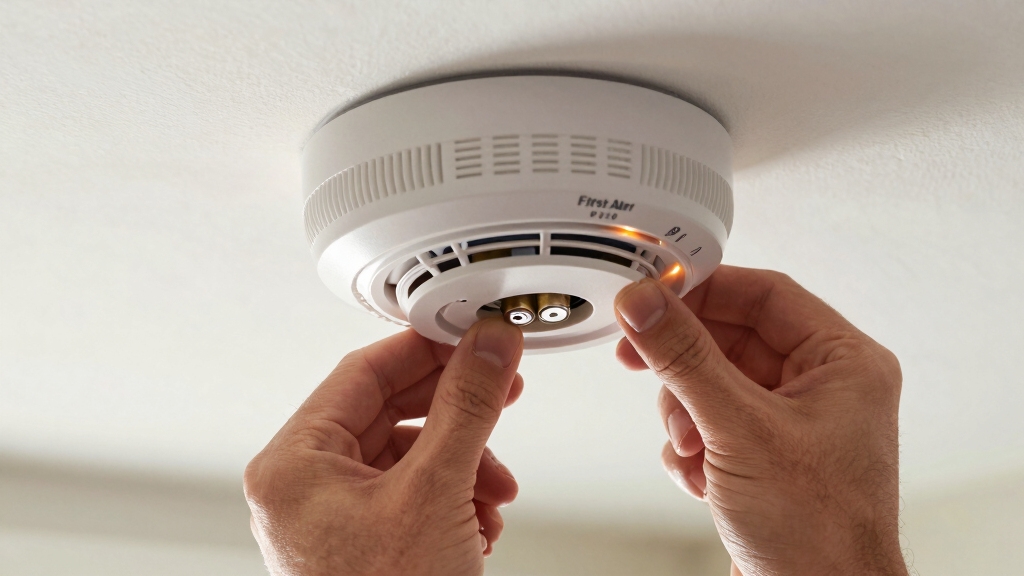
How To Install the New Battery and Reassemble Your First Alert P1210?
With the old battery removed, you’re ready to install the new CR17335 battery in your P1210.
First, align the battery connector with the circuit board plug, then firmly plug it in until it clicks.
Next, carefully place the battery and circuit board back into their slots, making sure the plastic tabs snap securely to hold them in place.
Once the battery is seated, position the top cover onto the base, aligning the screw holes.
Use your Phillips screwdriver to tighten the visible and hidden screws, ensuring the cover fits snugly without gaps.
Finally, if your unit has a deactivate switch, flip it back to the active position.
Make sure to test the alarm immediately after battery installation by pressing the test button to confirm it is functioning properly and providing reliable protection with the new battery testing procedures.
Your P1210 is now reassembled and ready for the next step.
How To Test Your First Alert P1210 After Battery Replacement?
After you’ve replaced the battery, go ahead and press the test button. This will trigger the alarm and let you know that the unit is powering up correctly.
Make sure to listen closely—you’re looking for a loud and clear alarm sound. It’s important that it’s easily audible.
For a thorough check, you might want to simulate some smoke near the detector. This way, you can see how it responds. It’s a good way to ensure everything’s working just as it should!
Remember to test weekly and after battery installation to verify proper alarm operation.
Self-Test Button Use
Regularly using the self-test button guarantees your First Alert P1210 smoke detector functions properly after a battery replacement. To perform the test, press and hold the button firmly for a few seconds. The unit should emit a loud alarm tone, confirming it’s operational.
When using the self-test button, keep these points in mind:
Test the detector immediately after installing the new battery to verify proper connection.
Perform monthly tests to maintain reliable operation.
If the alarm doesn’t sound, check battery installation and consider repeating replacement steps.
This quick check helps identify any issues early, guaranteeing your smoke detector remains ready to protect your home. Never skip this step after battery replacement. For optimal safety, replace batteries annually or when the unit’s 10-year lifespan is reached.
Alarm Sound Verification
Testing the alarm sound on your First Alert P1210 guarantees the smoke detector will alert you effectively in an emergency.
After replacing the battery, press and hold the test button firmly for at least 5 seconds. The alarm should emit a loud, continuous beep signaling proper function.
If the sound is weak, intermittent, or absent, double-check the battery connection and resecure the battery and circuit board.
Make sure the deactivate switch is off to enable full operation. Repeat the test until you hear a clear, consistent alarm.
Avoid releasing the button too soon, as this may prevent a full self-test.
Confirming the alarm sound makes certain your detector is ready to warn you of smoke hazards promptly and reliably.
Regularly using the built-in test button helps maintain alarm reliability and identifies units that may need attention.
Smoke Simulation Check
To make certain your First Alert P1210 smoke detector responds accurately to smoke, you should perform a smoke simulation check following the battery replacement. This test guarantees the photoelectric sensor detects smoke properly and triggers the alarm as intended.
Here’s how to perform the simulation safely:
Use a smoke test aerosol designed for smoke detectors; avoid real smoke or flames. Spray the aerosol near the detector’s sensing chamber, following product instructions.
Observe the alarm sound; it should trigger within seconds, confirming sensor functionality. If the alarm doesn’t sound, repeat the test once. Persistent failure indicates sensor issues requiring replacement.
Regular smoke simulation checks help keep your detector reliable and your home safe. The test works by verifying that the photoelectric sensor detects smoke particles through light scattering, which produces the electrical signal needed to activate the alarm.
Frequently Asked Questions
Can I Use Rechargeable Batteries in the First Alert P1210?
You shouldn’t use rechargeable batteries in the First Alert P1210. This model requires a specific 3V or 3.6V CR17335 non-rechargeable lithium battery designed for a 10-year service life.
Rechargeable batteries often have different voltage and discharge characteristics, which can cause malfunction or false alarms. Stick to the manufacturer’s recommended sealed lithium battery to guarantee proper operation and safety.
Always replace with the correct type for reliable smoke detection.
How Often Should I Clean the Smoke Detector Sensor?
You should clean your smoke detector sensor at least once every six months to keep it working properly.
Dust and debris can interfere with the sensor’s ability to detect smoke, causing false alarms or delayed warnings.
Use a soft brush or vacuum cleaner with a soft brush attachment to gently remove dust from the detector’s vents and sensor area.
Avoid using water or cleaning sprays that can damage the electronics.
What Should I Do if the Detector Chirps After Battery Replacement?
If your detector chirps after battery replacement, check connections, check placement, and check the deactivate switch.
First, make sure the battery connector is firmly plugged into the circuit board. Next, verify the battery sits securely under the plastic tabs.
Then, confirm the deactivate switch isn’t accidentally flipped on. If chirping continues, reset the unit by pressing the test button or remove and reinstall the battery.
Always perform a full test afterward to confirm proper operation.
Is It Safe to Open the Detector Without Professional Help?
Yes, you can safely open the detector yourself if you follow precautions.
Make sure to turn off power if it’s hardwired, and handle screws and internal parts gently.
Use a razor blade carefully to remove stickers covering hidden screws.
Avoid touching circuit board components unnecessarily.
If you’re unsure or uncomfortable, consult a professional.
Always test the detector after reassembly to confirm it functions correctly.
How Do I Dispose of the Old Lithium Battery Properly?
Think of your old lithium battery as a retired hero. It’s done its duty but still holds power that could harm the environment if ignored.
Don’t toss it in the trash; instead, take it to a local hazardous waste facility or a battery recycling drop-off. Many stores accept these batteries for safe disposal.
Handle it carefully and never puncture it, ensuring your hero’s legacy protects the earth, not endangers it.
Wrapping Up: Easy Steps for Long-Lasting Smoke Detector Performance
Now that you’ve nimbly navigated battery replacement for your First Alert P1210, you can confidently continue safeguarding your space.
Remember, regularly replacing the battery prevents pesky power problems, promoting peace of mind. With the right tools and a reliable replacement, you’ll swiftly swap out the old for the new.
Test thoroughly to trust your detector’s dependable duty. Stay safe, stay smart, and keep your smoke detector strong and sound!