Place your home security cameras at all primary entry points: doors, windows, gates, and garage areas to cover common access points.
Mount outdoor cameras elevated, typically 8 to 10 feet high, with slight downward angles to avoid vandalism and capture clear views.
Avoid aiming indoor cameras into private spaces like bedrooms or bathrooms. Focus indoor cameras on main hallways and high-traffic rooms.
Strategically positioning cameras reduces blind spots and enhances alerts for unusual activity. Explore further to optimize your home’s full security setup.
Key Takeaways
- Place cameras at all primary entry points including front/back doors, ground-floor windows, side gates, and garage doors for full coverage.
- Mount outdoor cameras 8-10 feet high with a slight downward angle to maximize field of view and reduce vandalism risk.
- Use elevated porch mounts under eaves or soffits to protect cameras from weather and capture unobstructed views of entry areas.
- Avoid placing cameras in bedrooms, bathrooms, or aimed through windows to respect privacy and prevent glare or sensor failure.
- Ensure overlapping fields of view at outdoor perimeter and driveway to eliminate blind spots and enhance motion detection capabilities.
Top Entry Points for Security Cameras
When securing your home, you should always prioritize placing cameras at top entry points where intrusions are most likely.
Focus on ground-floor doors, positioning cameras both inside and outside to guarantee comprehensive coverage.
Install cameras above or beside front and back doors to capture clear angles of anyone approaching.
Don’t overlook ground-level windows, as criminals often target these for break-ins.
Camera placement should monitor these vulnerable spots effectively.
Side gates leading to backyards require dedicated cameras with focused views to prevent unauthorized access.
Additionally, garage doors near driveways benefit from expansive coverage, capturing vehicles and individuals entering the property.
Strategically mounting your cameras at these critical points maximizes your home’s security by deterring intruders and providing clear, actionable footage for monitoring or investigation.
For optimal effectiveness, ensure cameras are mounted high on shelves or eaves to maximize vantage points and reduce detection risk.
Where Not to Put Your Security Cameras?
While placing cameras at key entry points strengthens your home’s security, it’s equally important to recognize areas where security cameras can undermine effectiveness or privacy.
Avoid installing cameras in bedrooms or bathrooms to respect personal privacy and comply with legal considerations.
Placing cameras indoors aimed through windows is ineffective, as motion sensors may fail and glare can distort footage.
Remote locations such as trees or poles reduce overall security by limiting coverage and increasing vulnerability to tampering.
Steer clear of spots with physical obstructions or interference, which block optimal views and compromise detection.
Finally, unfinished or hidden areas complicate installation and maintenance, potentially leading to system failures.
Prioritizing strategic placement guarantees your security system functions reliably without infringing on privacy or operational efficiency.
Additionally, ensuring your cameras have appropriate Wide Dynamic Range capabilities can improve visibility in challenging lighting environments.
Indoor Common Areas for Security Cameras
When it comes to setting up security cameras indoors, it’s a good idea to focus on high-traffic areas like living rooms and kitchens.
These spots are where daily activities happen, making them ideal for monitoring what’s going on.
Don’t forget about areas that hold valuables—think jewelry or electronics.
It’s super important to keep an eye on those places to deter theft.
Also, securing hallways and basements is a smart move.
It helps cover key access points while still respecting personal privacy.
Using cameras with local storage options indoors can ensure continuous recording even without WiFi.
Monitoring High-Traffic Zones
Indoor common areas frequently serve as critical points for monitoring because they connect multiple rooms and see regular activity. You’ll want to focus on zones that naturally gather foot traffic to maximize surveillance effectiveness.
Consider these key areas:
- Main stairs or hallways. They offer broad visibility of movement between floors and rooms, acting as choke points.
- Living rooms and kitchens. These high-use spaces provide insight into daily household activity and potential unauthorized access.
- Second-floor hallways. Monitoring these secures upstairs valuables without infringing on bedroom privacy.
Placing cameras strategically in these zones ensures you capture clear, actionable footage while respecting personal boundaries. Prioritize mounting positions that cover multiple angles and minimize blind spots to enhance your home’s overall security.
Additionally, positioning cameras to cover every entry point and potential blind spots is crucial for comprehensive surveillance.
Protecting Valuable Rooms
Valuable-room surveillance demands targeted camera placement to safeguard assets like jewelry, electronics, and sensitive documents. Position cameras to cover entry points and display clear sightlines without intruding on privacy. Aim for corners or mid-wall mounts to maximize visibility while minimizing blind spots.
Consider lighting and wiring access to guarantee consistent performance. Installing wired sensors with mechanical reed switches can further enhance security by providing reliable, interference-free monitoring without power requirements.
| Room Type | Camera Placement | Key Consideration |
|---|---|---|
| Home Office | Corner mount near door | Protect sensitive documents |
| Living Room | Opposite corner of valuables | Cover electronics and décor |
| Jewelry Room | Above entry, angled downward | Prevent theft, maximize field |
Securing Hallways and Basements
- Position cameras at both ends of hallways to monitor movement between floors and rooms without invading privacy in bedrooms.
- Install cameras near basement windows and entry points to detect unauthorized access, as basements often contain valuable items or utility controls.
- Use mounting positions that optimize field of view, such as inside corners or mid-wall placements.
Ensure cameras are protected from tampering and environmental factors.
For improved installation efficiency, consider using Power over Ethernet (PoE) to simplify wiring and provide both power and data through a single cable.
Outdoor Perimeter Spots for Security Cameras
When setting up your motion-activated cameras, it’s a good idea to focus on your driveway. This way, you can get clear shots of license plates, which can be super helpful for security.
Also, consider mounting the cameras high up under porches. This not only ensures you have an unobstructed view but also keeps your equipment safe from the weather.
Just a heads up—make sure to steer clear of any trees or poles that might create blind spots or leave your cameras vulnerable to tampering. It’s all about keeping everything secure and visible!
Mount cameras at least 7 feet high with a slight downward angle to maximize infrared sensor effectiveness and comply with privacy laws.
Motion-Activated Driveway Coverage
When setting up motion-activated cameras for driveway coverage, it’s essential to position them to capture clear license plate details and detect any movement efficiently.
You want to ensure peak angles and minimal blind spots for reliable alerts. Consider these key steps:
- Mount cameras at a mid-wall height angled toward vehicles entering and leaving. This maximizes license plate visibility without distortion.
- Choose locations free from obstructions like trees or poles to prevent false triggers and disablement.
- Use cameras with infrared or low-light capabilities to maintain clarity during nighttime activity.
Additionally, selecting cameras with motion-activated recording helps optimize battery life while ensuring critical events are captured.
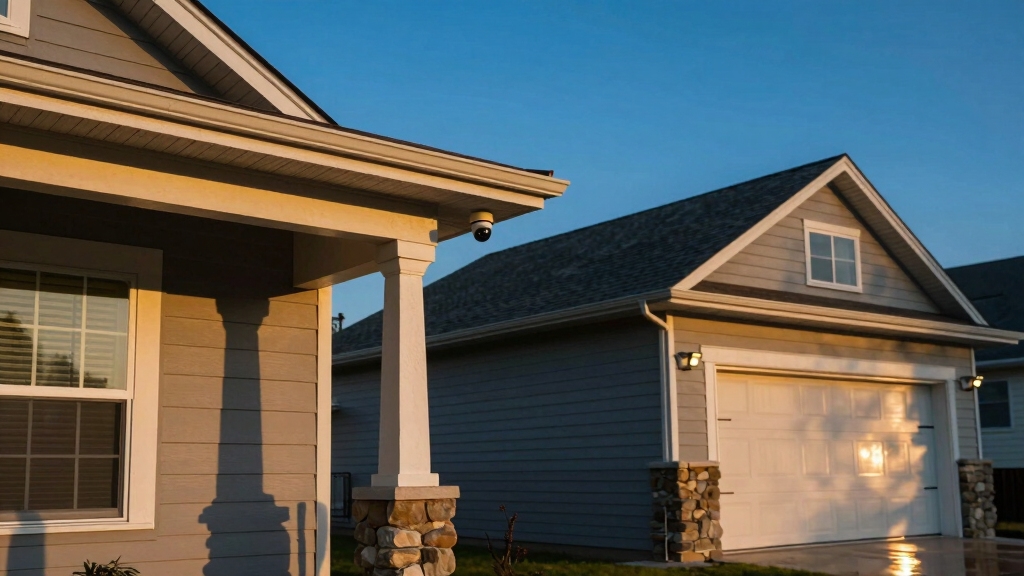
Elevated Porch Camera Mounts
Positioning cameras at elevated porch locations offers unobstructed and all-encompassing views of entry points and yard activity, enhancing your outdoor security perimeter effectively.
Mounting cameras under porch eaves or soffits provides natural shelter, reducing weather impact and extending device lifespan.
By placing cameras higher, you minimize vandalism risks and gain a broader field of view, capturing both front doors and adjacent yard spaces.
Make sure the angle covers all ground-level doors and windows within range without obstruction from walls or fixtures.
Use mounting positions that allow wiring access through attic or basement spaces for clean installation.
This strategy optimizes surveillance efficiency, giving you precise situational awareness while maintaining discreet, tamper-resistant camera placement critical for all-inclusive home protection.
Integrating cameras with motion sensors can further enhance security by triggering alerts upon detecting unusual activity.
Avoiding Outdoor Blind Spots
Blind spots often compromise outdoor security by leaving critical areas unmonitored. It’s essential to identify and eliminate them during camera placement.
To avoid these vulnerabilities, focus on strategic positioning that maximizes coverage without obstruction.
- Mount cameras under soffits or eaves to protect them from weather and gain unobstructed views. Avoid trees and poles that can block or disable cameras.
- Use overlapping fields of view with mid-wall or corner-to-corner placements. This ensures no gaps exist along driveways, gates, and yard perimeters.
- Incorporate motion-activated cameras at entry points like front and back doors, side gates, and garage areas. This optimizes detection while minimizing blind spots.
Ensure each camera’s unique identifier (UID) is visible or documented to assist with device management and secure remote access.
Choosing Mounting Heights and Angles for Cameras
Although mounting height and angle might seem straightforward, they critically affect a camera’s effectiveness in capturing clear, actionable footage.
You should position outdoor cameras high enough, typically 8 to 10 feet, to avoid vandalism and provide a broad field of view that covers entry points without obstruction.
Angle cameras slightly downward to capture faces and activities clearly, avoiding overly steep tilts that create blind spots or miss license plates.
Indoors, mount cameras at mid-wall height or corners to optimize coverage of hallways or living areas while minimizing privacy intrusion.
Adjust angles to cover high-traffic zones efficiently, ensuring valuables and access points fall within view.
Precision in height and angle reduces false triggers and enhances image clarity, making your security system more reliable and your monitoring more effective.
Planning Full Home Security Coverage
Mapping out your entire home’s security coverage guarantees no vulnerable spots go unnoticed. You’ll want a thorough plan addressing all critical areas, both inside and out.
Ensuring comprehensive security coverage leaves no vulnerable areas unprotected inside or outside your home.
Focus on these three key steps:
- Assess all entry points, including doors, windows, and gates. Position cameras to capture clear views without obstructions, assuring coverage from multiple angles where possible.
- Cover indoor common areas like main hallways and rooms with valuables. Balance security with privacy by excluding sensitive spaces such as bedrooms and bathrooms.
- Secure the outdoor perimeter with elevated cameras that avoid blind spots and environmental interference. Assure pathways and yards are monitored with motion detection. Optimize camera placement based on lighting and wiring accessibility.
Following this structured approach maximizes your home’s protection and camera system efficiency.
Frequently Asked Questions
How Do Weather Conditions Affect Outdoor Security Camera Performance?
Weather conditions can markedly impact your outdoor security camera’s performance.
Rain, snow, and fog reduce visibility and image clarity, while extreme temperatures may affect camera electronics.
Direct sunlight can cause glare or overheating, so you should position cameras under eaves or soffits for protection.
Wind can shake cameras, blurring footage, so secure mounts tightly.
You’ll want weatherproof models with proper IP ratings to guarantee consistent operation in harsh environments.
What Are the Best Camera Types for Low-Light Environments?
Sure, if you enjoy playing hide-and-seek with shadows, low-light environments are perfect.
But if you want actual security, you’ll choose cameras with infrared night vision and wide dynamic range (WDR) capabilities.
These cameras illuminate dark areas without blinding glare, ensuring clear images.
Additionally, consider thermal cameras for complete darkness. They detect heat signatures, giving you precise monitoring when visible light fails.
Don’t settle for anything less in low-light scenarios.
Can Security Cameras Integrate With Smart Home Systems?
Yes, security cameras can integrate seamlessly with smart home systems. You’ll find many models compatible with platforms like Alexa, Google Home, or Apple HomeKit, allowing you to control cameras via voice commands or mobile apps.
Integration enables real-time alerts, remote viewing, and automation, such as linking cameras with smart locks or lighting. This connectivity enhances your home’s security, making monitoring more efficient and your response faster.
How Often Should Security Camera Footage Be Reviewed or Backed Up?
You should review security camera footage at least once a week to promptly detect any suspicious activity.
Backing up footage every 7 to 14 days minimizes data loss risks; studies show 30% of users lose footage due to delayed backups.
Automate backups to cloud or external drives for reliability.
Frequent reviews and backups guarantee you maintain complete records, improve incident response, and protect your property effectively without overwhelming your schedule.
What Legal Considerations Exist for Recording Neighbors or Public Spaces?
You must respect privacy laws when recording neighbors or public spaces. Avoid capturing private areas like windows or yards where there’s a reasonable expectation of privacy.
Public spaces generally allow recording, but audio recording often requires consent. Check local regulations, as laws vary by jurisdiction.
Use cameras solely for security purposes and inform neighbors if your cameras might capture their property. Always balance safety with legal and ethical responsibilities.
Secure Every Angle: The Power of Strategic Camera Positioning
To maximize your home’s security, place cameras at key entry points like front doors and garage entrances while avoiding blind spots such as facing direct sunlight.
For example, a homeowner in Chicago prevented a break-in by positioning cameras at eye level overlooking both the driveway and backyard.
By carefully planning mounting heights and angles, you guarantee all-encompassing coverage inside and outside your home, deterring intruders and providing you with peace of mind.