To change a battery in a high ceiling smoke detector, first isolate power at the circuit breaker to prevent shocks and false alarms.
Use a telescoping pole fitted with a tape-secured screwdriver or duct tape ball to open the battery compartment and remove the old battery without dropping it.
Insert a new 9V alkaline battery, matching polarity, then securely close and remount the detector, ensuring it sits flush.
Finally, test the alarm for proper function. Following these steps guarantees a safe, effective replacement—continue for detailed guidance.
Key Takeaways
- Use a telescoping pole with a tape-wrapped end or duct tape ball to reach and remove the battery from the high ceiling smoke detector.
- Isolate power at the fuse box and verify with a voltage tester before starting battery removal to avoid electrical hazards and false alarms.
- Gently rock the detector and use a rope or pole-mounted screwdriver if needed to open the battery compartment remotely.
- Insert the new 9V alkaline battery with correct polarity and securely close the battery door using the pole-mounted screwdriver.
- Test the alarm by pressing its test button until a loud tone sounds, confirming proper operation after battery replacement.
Prepare Tools for Changing High Ceiling Smoke Detector Batteries
Before you begin changing the battery in a high ceiling smoke detector, gather and prepare the necessary tools to guarantee safety and efficiency.
Use a broom handle or paint stick wrapped tightly with sticky tape at the end to extract the battery securely.
Use a broom handle or paint stick wrapped with sticky tape to safely and securely remove the battery.
Form a ball of duct tape on the pole’s tip for effective battery removal.
Attach a screwdriver firmly to the pole using tape to open the battery compartment remotely.
Have a rope ready to snare and tug the detector if needed.
A telescoping pole equipped with a painter’s tool can help access the battery compartment precisely.
Confirm tape adhesion by wrapping multiple layers tightly to prevent slippage.
Position the pole rigidly to maintain control and avoid wobbling during operation, ensuring a smooth battery change process.
Always ensure you use high-quality batteries to prevent leakage and maintain reliable detector operation.
Safely Disconnect Power Before Removing the Detector
First things first, you’ll want to locate your home’s fuse box. Once you find it, identify the circuit that controls your smoke detector. Go ahead and turn off the power to that circuit. This step is super important to ensure that no electrical current is flowing to the alarm.
After that, it’s a good idea to double-check that the power is indeed off. Grab a voltage tester and verify the power isolation before you start removing the detector. Better safe than sorry, right?
Also, remember to enter your security code on the keypad to silence any tamper alerts that might activate during power disconnection.
Locate Fuse Box
To safely disconnect power before removing the smoke detector, locate the fuse box that controls the circuit supplying your alarm. This step guarantees you can isolate the electrical supply without risk of shock or damage.
Start by identifying the main electrical panel in your home, commonly found in basements, utility rooms, or garages. Once there, look for labeled breakers or fuses corresponding to the smoke detector circuit.
Focus on these key points:
- Check labels or use a circuit tester to confirm the correct breaker.
- If labels are missing or unclear, turn off breakers one at a time to identify the correct circuit.
- Guarantee you have easy access to the fuse box throughout the battery replacement process.
Proper fuse box location is critical for safe power isolation before handling the detector.
Always verify the line and load wires with a voltage tester after switching off the power to ensure complete circuit de-energization.
Turn Off Power
Once you’ve identified and accessed the fuse box controlling your smoke detector circuit, you’ll need to switch off the power to eliminate any electrical hazards during removal.
Locate the specific breaker or fuse labeled for the smoke detector or the circuit it’s on. Flip the breaker to the “off” position or remove the fuse completely.
This step guarantees no current flows to the device, preventing shock or damage while you work. Avoid relying solely on the detector’s indicator light or chirps to confirm power status.
After switching off, avoid touching any wires or terminals until you’re certain power is disconnected. Maintaining strict adherence to this safety step protects you and your equipment throughout the battery replacement process.
Always verify power is off by testing the alarm or using a voltage tester before proceeding.
Verify Power Isolation
Although you’ve turned off the breaker or removed the fuse, you should still verify power isolation before handling the smoke detector. This step assures your safety and prevents electrical shock while working at height.
Use a non-contact voltage tester or a multimeter to confirm no live current is present at the detector’s wiring. Check the following:
- Test the voltage tester on a known live source first to verify functionality.
- Place the tester near the smoke detector’s terminals to ensure zero voltage.
- Recheck the breaker or fuse box for the correct circuit label to avoid mistakes.
Only after confirming power isolation should you proceed with removing the detector. This precise verification minimizes risk and guarantees a safe environment for battery replacement.
Always notify central monitoring station and place the system in test mode before starting any maintenance work to prevent false alarms or unnecessary emergency responses.
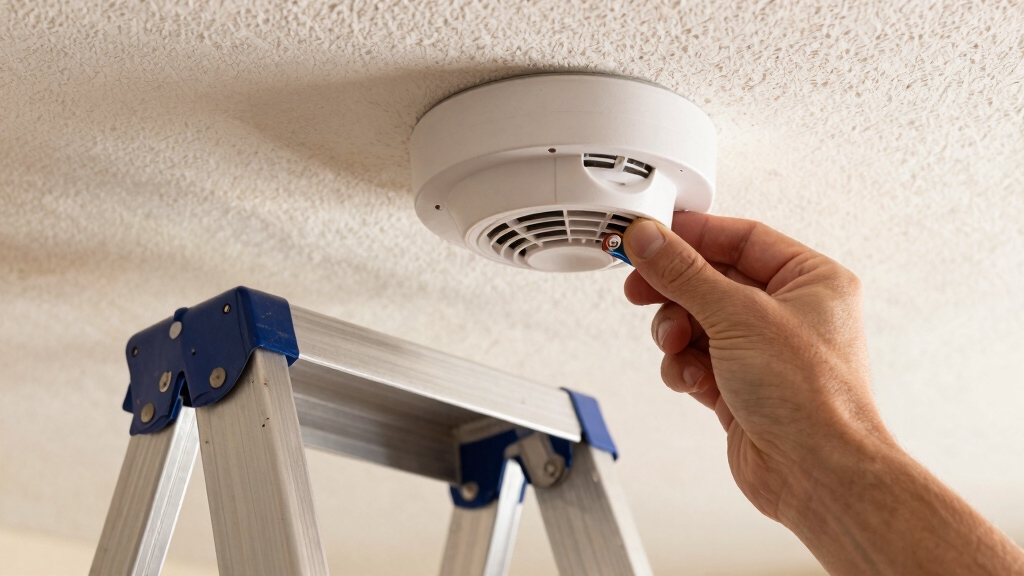
How to Remove Smoke Detectors From High Ceilings?
When working with smoke detectors mounted on high ceilings, you’ll need specialized tools and techniques to safely and effectively remove them.
First, confirm power isolation at the fuse box to prevent electrical hazards.
Always verify power is off at the fuse box to ensure electrical safety before starting.
Use a telescoping pole fitted with a screwdriver taped securely at the end to engage the battery door’s slot.
Turn it anticlockwise to release the detector head.
Next, gently rock the unit back and forth like a pendulum to loosen it from the mount.
If needed, use a rope looped around the detector and tug briskly to disconnect the plug.
Maintain a rigid pole position to avoid wobbling.
Photograph battery orientation before removal for reference.
Employ duct tape or sticky tape on the pole end to grasp and extract batteries without dropping them.
Always ensure to replace batteries annually or immediately when low-battery warnings occur to maintain detector functionality.
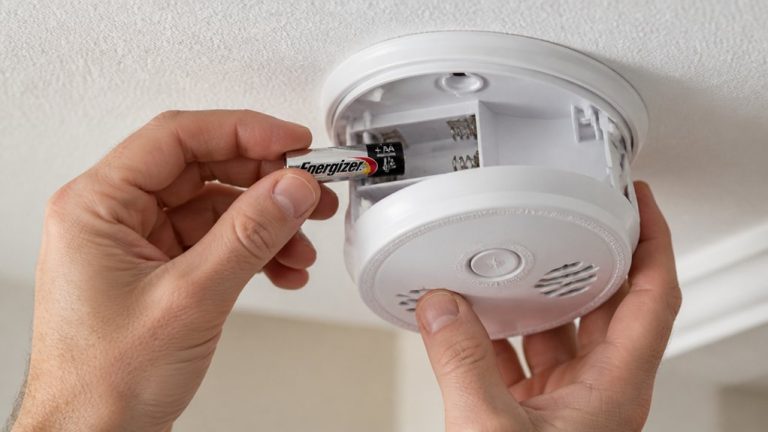
Removing and Replacing Smoke Detector Batteries Without Dropping Them
After safely detaching the smoke detector from a high ceiling using the telescoping pole and rope methods, focus shifts to removing and replacing the batteries without dropping them.
Use tools like tape-wrapped poles or duct tape balls to secure batteries during extraction and insertion. Follow these key steps:
Adhere sticky tape or a duct tape ball to the pole end. Press firmly against the battery to lift it over retention lips.
Insert the new battery, matching polarity. Use the tape method to slide it precisely into the compartment.
Securely close the battery door with a screwdriver taped to the pole. This guarantees no parts loosen or fall.
Maintain steady pole positioning to prevent wobbling. Check adhesion strength by wrapping multiple tape layers.
This precise approach minimizes battery drops and ensures safe replacement at height. Many smoke detectors rely on backup batteries to maintain operation even during power interruptions.
How to Reinstall Your Smoke Detector Securely on the Ceiling?
Align the smoke detector carefully with the ceiling mount, ensuring the alarm rim rests securely on the carrier edge.
Position the smoke detector precisely so its rim sits securely on the ceiling mount edge.
Extend your telescoping pole to position the detector precisely against the ceiling plate.
Use the magnets embedded in the carrier and alarm housing to assist in alignment and secure attachment.
Nudge the detector gently until you feel it click or magnetically lock in place, confirming a firm hold.
Avoid excessive force to prevent damage to the mounting or alarm components.
Confirm that the detector sits flush without wobbling.
If your model uses screws, use the pole-mounted screwdriver to tighten them carefully, ensuring not to overtighten.
Once secured, visually inspect the connection and verify that the alarm remains firmly attached before concluding the installation process.
Always maintain steady footing and ensure safety precautions when working near ceiling-mounted devices.
Test Your Smoke Detector After Battery Replacement
Always test your smoke detector immediately following a battery replacement to confirm proper operation. This step makes certain the alarm functions correctly and provides reliable safety.
Start by pressing the test button firmly until you hear the alarm sound. If the sound is weak or absent, recheck the battery installation and polarity. Confirm the detector resets after testing by listening for silence.
Key points to verify:
- The alarm emits a loud, continuous tone within seconds of pressing the test button.
- The detector resets promptly after releasing the button, indicating normal operation.
- No chirping or error signals occur post-test, which would suggest installation issues.
Performing this test guarantees your smoke detector is ready to alert you in case of emergency. If the alarm fails to sound, inspect connections to ensure wires are firmly seated without pinching and verify battery orientation and charge.
Safety Tips for Changing High Ceiling Smoke Detector Batteries
Changing the batteries in high ceiling smoke detectors can feel a bit daunting, right?
First things first, always grab a stable ladder. Just a quick tip: steer clear of those oversized models. They can be a bit wobbly and increase your risk of accidents.
Now, before you start climbing, it’s a good idea to isolate the electrical supply at the fuse box. This step is super important because it helps eliminate any shock risk. Safety first!
And don’t forget, if you hear that annoying chirp from your smoke detector, it’s time to replace the batteries. Staying on top of this will help keep your detector functioning properly and prevent those pesky false alarms. Easy peasy!
For many smoke detectors, using 9V alkaline batteries provides reliable power and easy replacement.
Ladder Safety Precautions
Frequently, the most overlooked step in changing smoke detector batteries on high ceilings is securing safe ladder use. Before climbing, always inspect your ladder for stability and make certain it’s rated for your weight.
Position the ladder on a flat, non-slippery surface to prevent shifting. Maintain three points of contact, two hands and one foot or two feet and one hand, while ascending and working. Avoid overreaching; instead, move the ladder to keep your body centered.
Follow these key ladder safety precautions:
Use a ladder height that allows you to comfortably reach the detector without standing on the top rung. Have a helper steady the ladder’s base to increase stability. Keep tools secured or attached to your belt to free your hands for climbing safely.
Adhering to these precautions minimizes falls and makes for a safer battery change process.
Electrical Isolation Steps
Before handling the smoke detector, you should isolate the electrical supply at the fuse box to prevent accidental shocks or false alarms.
Locate the fuse or circuit breaker controlling the smoke detector’s power and switch it off.
Confirm power disconnection by testing the detector or using a voltage tester if available.
This step avoids triggering the alarm during battery removal, protecting you from electrical hazards.
Never skip this isolation to guarantee safety and prevent nuisance alarms.
After isolating power, proceed carefully with battery removal tools.
Only restore power once the new battery is installed and the detector is securely reassembled.
Maintaining strict electrical isolation throughout the process minimizes risk and guarantees safe, effective battery replacement in high ceiling smoke detectors.
Battery Replacement Timing
You should promptly replace the battery as soon as the smoke detector emits a chirping sound, indicating low power.
Delaying replacement risks false alarms or detector failure, compromising safety. Make sure you plan battery changes during daylight or when assistance is available to minimize hazards.
Key timing considerations include:
Replace batteries annually or immediately after low-battery alerts. Avoid waiting for multiple chirps; one signal is sufficient to act. Test alarm functionality after replacement to confirm proper operation.
Frequently Asked Questions
How Often Should I Replace Batteries in High Ceiling Smoke Detectors?
You should replace batteries in high ceiling smoke detectors at least once a year to ensure dependable operation.
Additionally, change them immediately if you hear chirping, which signals low battery power. Regular testing after replacement confirms functionality.
For safety, always isolate electrical supply before handling and use proper tools to avoid damage. Keeping batteries fresh prevents false alarms and maintains peak detector performance.
Don’t delay replacement to avoid safety risks.
Can I Use Rechargeable Batteries in Smoke Detectors?
You absolutely can use rechargeable batteries in smoke detectors, but they’re not always the best choice.
Rechargeables like NiMH have lower voltage (1.2V) compared to alkalines (1.5V), which might cause the alarm to fail or chirp prematurely.
If you choose rechargeables, make sure they match the detector’s voltage requirements exactly and test thoroughly after installation.
Remember, reliable power is essential.
Don’t let a weak battery turn your safety device into a ticking time bomb.
What Type of Batteries Work Best for Smoke Detectors?
You should use 9-volt alkaline batteries for most smoke detectors because they provide consistent power and long shelf life.
Lithium 9-volt batteries also work well, offering extended life and reliable performance, especially in extreme temperatures.
Avoid rechargeable batteries as their voltage can drop below detector requirements, causing false alarms.
Always check your detector’s manual for specific recommendations.
Replace batteries promptly when the low-battery chirp sounds to maintain peak safety.
How Do I Know if My Smoke Detector Is Faulty?
Better safe than sorry. You’ll know your smoke detector is faulty if it frequently chirps despite fresh batteries, fails to sound during testing, or shows physical damage.
Test it by pressing the test button; no alarm means a problem. If the detector’s age exceeds 10 years, replace it.
Regularly check connections and clean dust buildup, as these can cause malfunctions. Don’t ignore any irregularities to guarantee your safety.
Can Smoke Detectors Be Cleaned Without Removal?
Yes, you can clean smoke detectors without removal by gently vacuuming the outer vents using a soft brush attachment.
Use compressed air to blow out dust, but avoid forcing debris deeper inside. Power off the alarm if possible to prevent false alarms during cleaning.
Regular cleaning improves sensor accuracy and prevents false alerts. However, deep internal cleaning or battery replacement will require removal following manufacturer guidelines for safety and effectiveness.
Stay Safe Above All: Mastering High Ceiling Smoke Detector Maintenance
Changing the battery in a high ceiling smoke detector requires preparation, caution, and precision. Gather your tools, disconnect power safely, and carefully remove the detector without dropping it.
Replace the battery securely, reinstall the detector firmly, and test it thoroughly. Follow safety tips diligently, work methodically, and verify functionality consistently.
By doing so, you’ll guarantee your smoke detector operates reliably, protecting your home and giving you peace of mind.