To deactivate your garage door remote, locate the Learn button on the main motor unit, often near the light or under a plastic cover.
Press and hold this button for 6 to 10 seconds until the LED turns off to erase all programmed remotes, preventing unauthorized access.
For removing a single remote, press the Learn button once, then press the remote button to delete it individually.
After deactivation, you can secure your garage further and reprogram devices as needed to maintain control.
Key Takeaways
- Press and hold the Learn button on the garage door opener for 6–10 seconds until the LED turns off to clear all programmed remotes.
- To remove a single remote, press the Learn button once, then press the remote button to delete its code individually.
- Disconnect power by unplugging the opener or cutting power at the breaker before accessing the Learn button or working on wiring.
- Manually lower and lock the door, and disconnect the emergency release cord after deactivating remotes for enhanced security.
- Periodically perform a full memory reset to eliminate unauthorized remotes and prevent code overlap in your garage door system.
Why and When You Should Deactivate Your Garage Door Remote?
When you decide to deactivate your garage door remote, you’re taking an important step to enhance your home security and control.
Deactivating your garage door remote is a key step to boost home security and maintain control.
You should deactivate the remote whenever you lose it or suspect it’s been stolen to prevent unauthorized access.
It’s also wise to disable remotes when tenants move out or after selling your home to make sure previous users can’t operate the door.
Additionally, if you upgrade your security system or switch to a new remote model, deactivating old devices prevents interference and confusion.
Deactivation keeps your garage secure by eliminating remote signals that could be hacked or accidentally triggered.
Taking timely action protects your property and gives you full command over who can open and close your garage door.
For persistent issues with remotes, it’s recommended to seek professional help to ensure proper reset and security.
Where to Find the Learn Button on Your Garage Door Opener?
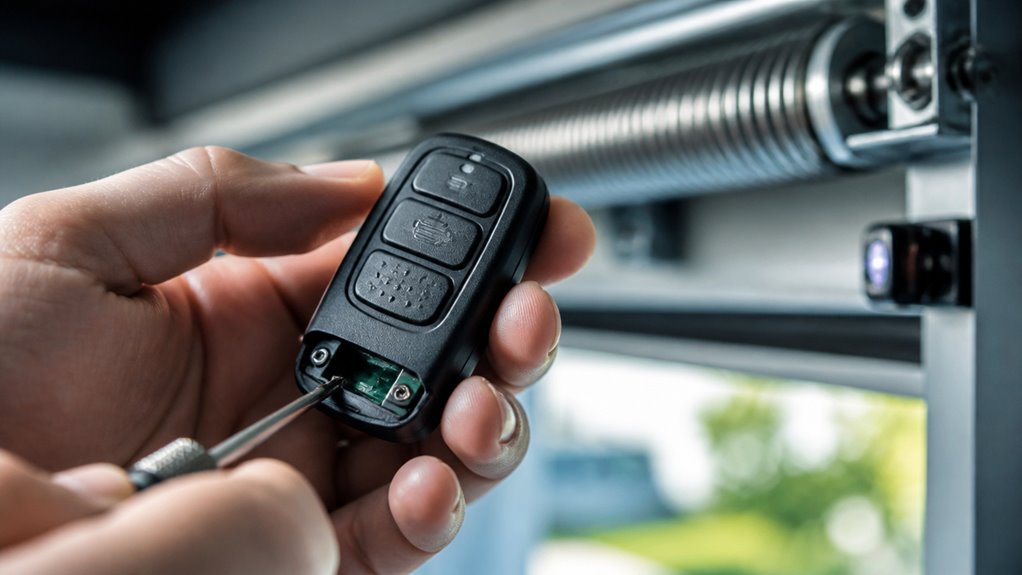
To locate the Learn button on your garage door opener, start by examining the main motor unit mounted on the ceiling of your garage.
The Learn button is typically near the light bulb or hidden under a small plastic cover. Its color varies by manufacturer—common colors include yellow, red, purple, or blue.
If you don’t see it immediately, consult your opener’s user manual for the exact location. Some models may label it as “Smart” instead of “Learn.”
Identifying this button is vital because it controls remote programming and deactivation functions.
Take note that on certain models, the Learn button might be recessed or require removing a cover to access, so handle the unit carefully while searching.
For safety, always disconnect power by unplugging the opener before attempting to access the Learn button or perform any battery-related maintenance.
How to Clear All Remotes From Your Garage Door Opener?
Now that you’ve located the Learn button on your garage door opener, you can use it to clear all programmed remotes from the system’s memory.
This process guarantees no remote can operate your garage door until you reprogram them.
To clear all remotes:
- Press and hold the Learn button for 6 to 10 seconds until the LED light turns off.
- Watch for the indicator light to stop blinking, confirming the memory reset.
- Test your remotes; none should activate the door now.
Remember, holding the reset button for 5–10 seconds erases previous remote connections and requires reprogramming each remote to restore function.
How to Remove a Single Garage Door Remote Without Resetting All?
You know, it’s pretty easy to remove just one garage door remote without having to reset everything. You can actually use the individual remote deletion feature on your opener.
First, just press the “Learn” button for a moment. After that, go ahead and press the button on the remote you want to deactivate. If you see the LED blink, that’s your confirmation that it worked!
Lastly, give the remote a quick test to make sure it no longer operates the door. And that’s it—simple, right? This method helps avoid reprogramming all remotes and maintains secure rolling code technology on your garage door system.
Single Remote Deletion
Remove a single garage door remote from your opener’s memory without wiping the entire system by using the individual remote deletion feature if your model supports it. First, locate the “Learn” or “Smart” button on the motor unit.
Then, press this button once; don’t hold it down. Immediately after, press the button on the remote you want to deactivate. Watch for the LED indicator to blink once; this confirms the remote’s removal.
To make certain success:
- Verify your opener supports individual remote deletion by consulting the manual.
- Perform the button sequence promptly to avoid timing out.
- Test the remote afterward to confirm it no longer operates the door.
This method preserves all other remote controls while securely removing the targeted device. For enhanced security, it is also recommended to perform a full memory erase periodically to eliminate any unauthorized remotes or code overlap.
Confirm Remote Removal
After deactivating a single remote, it’s essential to verify that the removal was successful to maintain your garage door’s security.
Start by testing the remote you just erased. Press its button near the garage door opener. If the door doesn’t respond, the remote removal succeeded.
Next, test other active remotes to confirm they still operate normally. This guarantees only the targeted remote was deactivated.
If the removed remote still functions, repeat the individual deletion process carefully. Consult your opener’s manual if your model supports this feature. Some require precise timing between pressing the “Learn” button and the remote button.
Confirming remote removal prevents unauthorized access without resetting all devices. This preserves convenience and security.
Don’t skip this step to guarantee your garage door system remains secure and properly configured.
Additionally, be aware that weak remote control batteries can cause inconsistent signals or no response, potentially affecting your verification process.
How to Keep Your Garage Door Safe After Deactivating Remotes?
When securing your garage door following remote deactivation, it’s essential to implement multiple layers of protection to prevent unauthorized access.
Simply clearing remotes isn’t enough; physical and electrical safeguards help maintain security.
Start by manually lowering and locking the door to block any forced entry.
Next, disconnect the emergency release cord to prevent manual disengagement of the opener mechanism.
Finally, cut power to the garage door motor at the circuit breaker to disable any accidental or unauthorized activation.
Follow these three critical steps for robust security:
- Engage manual locks and guarantee the door is fully closed.
- Disconnect the emergency release cord to disable trolley movement.
- Turn off the power supply to the opener unit at the breaker panel.
Additionally, be sure to regularly inspect and maintain the manual release mechanism to ensure it functions safely and securely.
This multi-faceted approach keeps your garage secure until you’re ready to reprogram.
How to Reprogram Remotes After Clearing Garage Door Memory?
To reprogram your remotes after clearing the garage door memory, first, you’ll want to find the “Learn” button on your opener motor unit. It’s usually located near the light or tucked under a plastic cover.
Once you spot it, go ahead and press and release that button. This action puts the system into programming mode.
Now, grab the remote you want to program. Press and hold the button you wish to use until you see the opener’s indicator light blink twice. That’s your confirmation that the remote has been successfully registered.
For best results, check your opener manual to ensure remote compatibility with the specific frequency and rolling code technology used by your system.
Easy, right? Just follow these steps, and you’ll be back in business in no time!
Locating The Learn Button
Tracking down the “Learn” button is your essential first step for reprogramming remotes after clearing your garage door opener’s memory.
This button is typically on the motor unit, near the light bulb or under a plastic cover. Its color varies by brand, commonly yellow, red, purple, or blue.
If you can’t spot it, check your opener’s manual for its exact location.
To locate the “Learn” button efficiently:
- Inspect the motor housing, especially near the light bulb or under plastic shields.
- Identify the button by its distinct color, matching it to your manufacturer’s guide.
- Consult the user manual if the button isn’t visible or is hidden behind a panel.
Knowing where this button is lets you proceed confidently with remote reprogramming. For consistent device communication and avoiding interference, consider the importance of avoiding interference sources near your garage door opener.
Programming Remote Devices
Once you’ve located the “Learn” button on your garage door opener motor unit, you’re ready to reprogram your remote devices after clearing the memory.
Press and release the “Learn” button; the LED light will turn on, signaling it’s in programming mode.
Within 30 seconds, press and hold the button on the remote you want to reprogram. Keep holding it until the LED blinks twice, confirming successful programming.
Test the remote by pressing its button to ensure it operates the door.
Repeat this process for each remote device you want to add.
Remember, if the LED doesn’t blink or the remote fails to operate, check the batteries or start the process again.
For safety, always unplug the garage door opener before inspecting or adjusting any wiring during programming to avoid electrical hazards related to wiring and connections.
This method guarantees only authorized remotes control your garage door.
Troubleshooting Garage Door Remote Deactivation Issues
When you run into trouble deactivating your garage door remote, start by checking the condition of the wall button and the surrounding environment.
Dust, moisture, or debris can cause the contacts to stick, preventing proper function.
Next, inspect for nearby devices emitting interfering radio frequencies, especially with older openers.
Finally, reset the system by cutting power at the breaker for 30 seconds, then restore it.
To troubleshoot effectively:
- Verify the security code on the keypad (if used) is correct.
- Make sure remote batteries are fresh and properly installed.
- Confirm that you completed the memory clear or individual remote deletion steps correctly.
These checks address most common issues, helping you regain control over your garage door remote deactivation.
Frequently Asked Questions
Can I Deactivate My Garage Door Remote Using a Smartphone App?
You can deactivate your garage door remote using a smartphone app only if your opener supports smart connectivity and integrates with the app.
Most modern openers allow you to manage access, including disabling remotes remotely.
Check your opener’s manual or app features for remote control management.
If it doesn’t support this, you’ll need to deactivate the remote manually by clearing the opener’s memory or using the “Learn” button on the motor unit.
Does Deactivating the Remote Affect My Garage Door’s Manual Operation?
Deactivating your garage door remote won’t make your manual operation feel like climbing Mount Everest.
You can still pull the emergency release cord and lift the door by hand easily. The remote’s deactivation only disables wireless control, leaving the physical mechanics untouched.
Just remember to make sure the door is fully closed and secured manually after deactivation, so it stays safe and functional without the remote’s help.
How Long Does the Deactivation Process Take on Average?
The deactivation process usually takes about 10 to 15 seconds.
When you press and hold the “Learn” button, the LED indicator will turn off within that time, confirming the memory is cleared.
If you’re deleting individual remotes, it only takes a few seconds per remote.
Just watch for the LED blink as confirmation.
Will Deactivating Remotes Void My Garage Door Opener Warranty?
Deactivating remotes won’t typically void your garage door opener warranty since it’s a standard function designed by manufacturers.
You’re simply managing your device’s security features without altering hardware.
However, if you perform unauthorized modifications or damage components during the process, that might impact your warranty.
Always follow the manufacturer’s instructions carefully and consult your warranty terms to make certain you stay covered while securing your system.
Can Multiple Garage Door Openers Be Linked to One Remote?
Think of your remote as a master key that can open multiple doors. Yes, you can link one remote to several garage door openers, but it depends on the brand and model.
You’ll need to program each opener individually by syncing the remote with each unit’s “Learn” button. Follow the manufacturer’s instructions carefully to avoid conflicts and guarantee smooth operation across all connected doors.
Protect Your Garage From Lost or Stolen Remotes
Deactivating your garage door remote is a smart step for security. Did you know over 30% of break-ins involve garage access?
By clearing or selectively removing remotes, you maintain control and protect your home. Always locate the learn button first, follow proper steps, and reprogram remotes carefully.
If issues arise, troubleshoot promptly to avoid vulnerabilities. Taking these measures guarantees your garage stays secure and only authorized users have entry, giving you peace of mind.